SCA Second Year Semester 1
Research Portfolio - Abigail Jarvis
520466962
Note: 'Studio Notes' button will take you to a new tab
20-4-2023
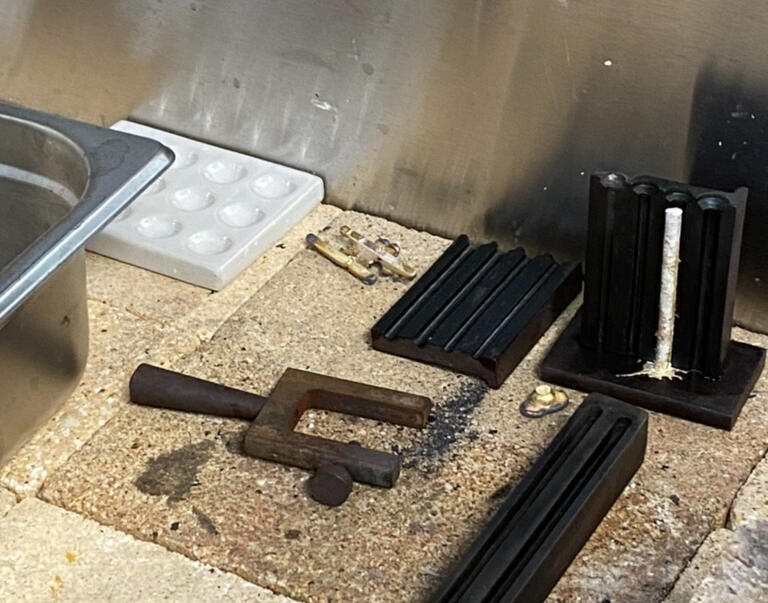
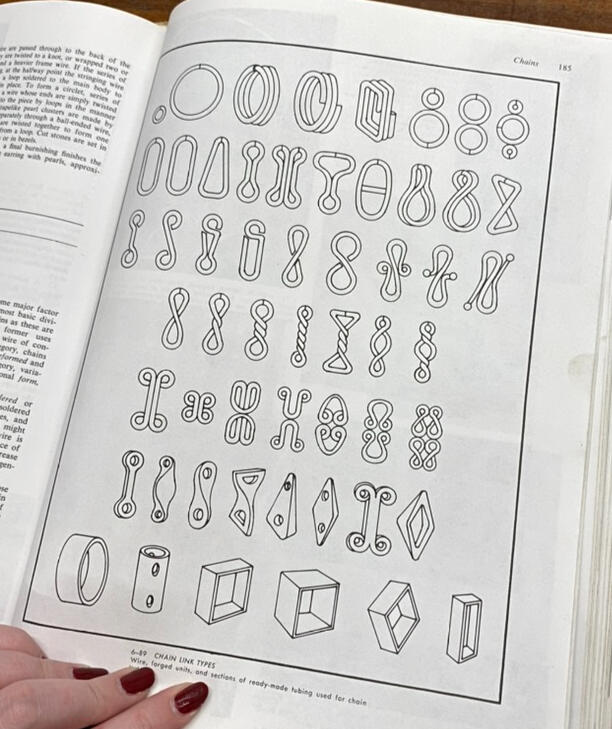
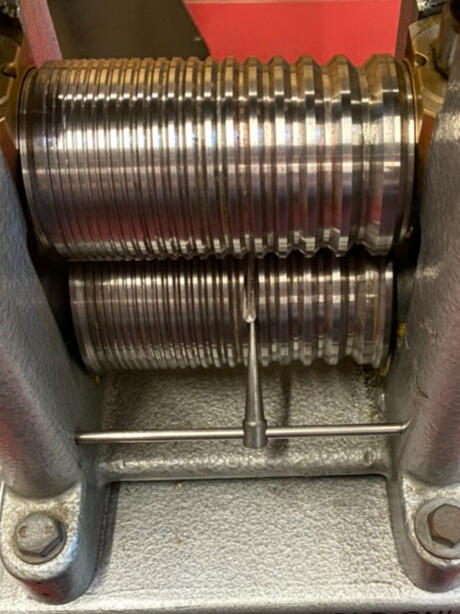
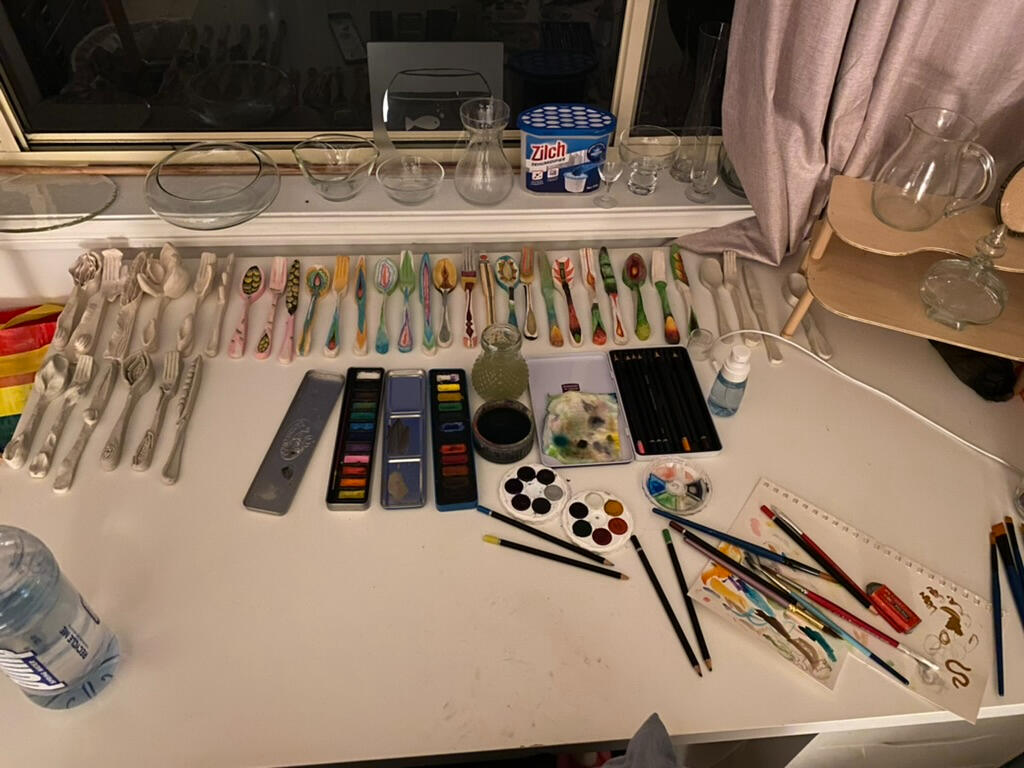
For the first jewellery tech, Rhonda showed us around the studio and then demonstrated how to cast a silver ingot.
I went first after her to cast my ingot, which you can see towards the back of the bend in the photo below. We got assigned a cubby and a tool kit each as well. The extra photos are examples of chain ideas

26-04-2023 outside hours
I came in this Wednesday to clean up my messy ingot to get a section that was usable, I've left the majority of the rest to potentially remelt for my assessment. I didn't take any photos.
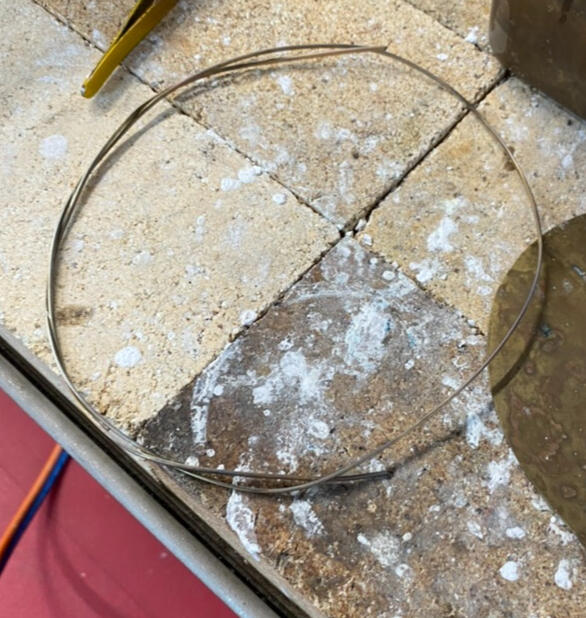
27-04-2023
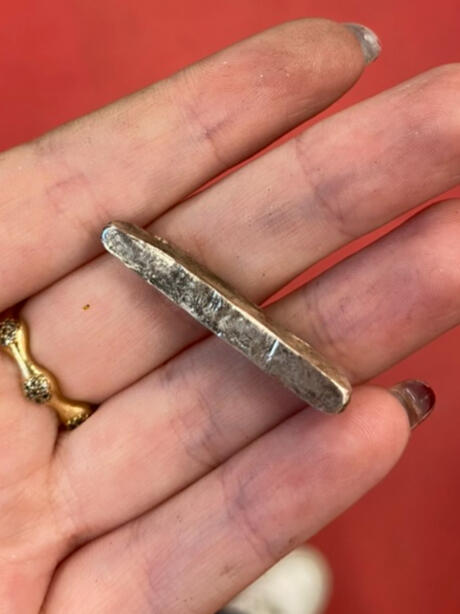
Today Rhonda showed us how to forge our ingot, anneal and clean it before beginning to roll it out using the rolling mill.
Forging was really fun, if a little difficult because of the weight of the hammers and how low the anvils were. Already from just hammering I could see how my small piece was stretching out. When the work was clean it was nice to see it smoother out and fairly even. We pick the plate we want to use before rolling so we can know how small we're meant to go. I'm going pretty much as small as possible, and I want my coil/rings to be pretty small too which might be frustrating but I think the final thing will be more effective. I've hoping to use this wire and chain to potentially crochet, but I'm not sure how difficult sodlering it will be.
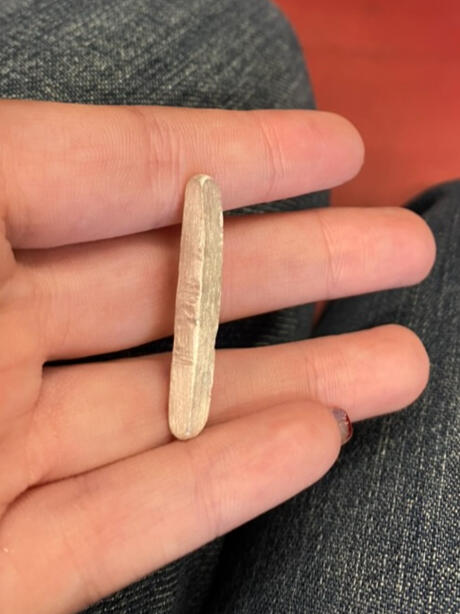

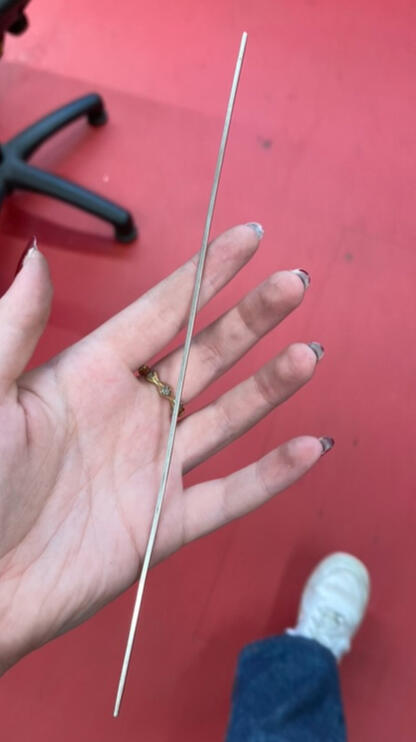
The next step is to anneal again to soften the wire in the last image above, which is already super long.
04-05-2023
I cut down the wire to keep some for my assessment, 10cm for assessment and the rest I made into links. I didn't take photos for a lot of these processes because the process was so involved I wasn't thinking about going on my phone, and the second I finished one aspect I went straight into the next.
11-05-2023
Began working on a brass ring. I kept mine long. the formula is (diameter of the desired ring + metal thickness) x 3.14.
I didn't cut mind down or anything.
18-04-2023
Some initial brainstorming of ideas
04-05-2023
some sketches of potential designs
02-05-2023
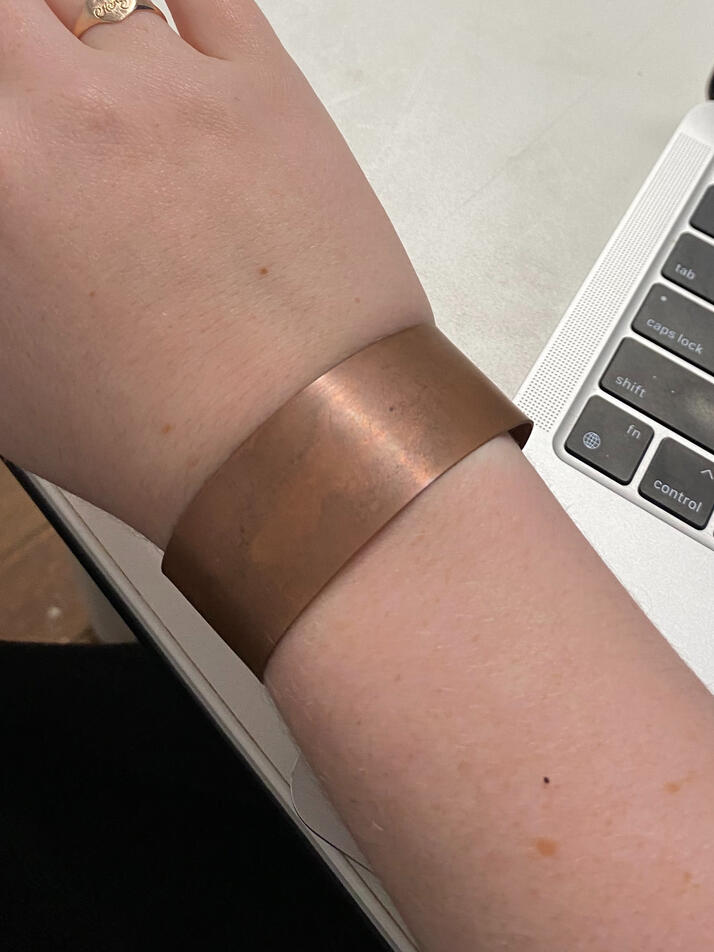
Today I did a very simple mock-up of a potential wrist cuff to familiarise myself with the process. I used copper.

04-05-2023
Started making a chain, thinking I'd include it in my piece but ended up changing my mind.
09-05-2023
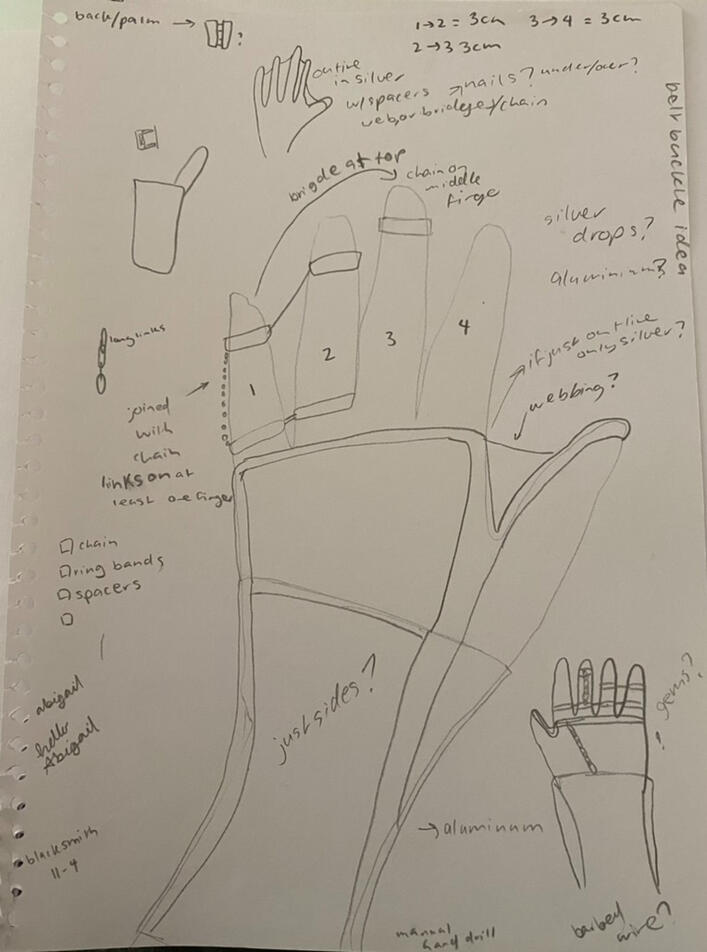
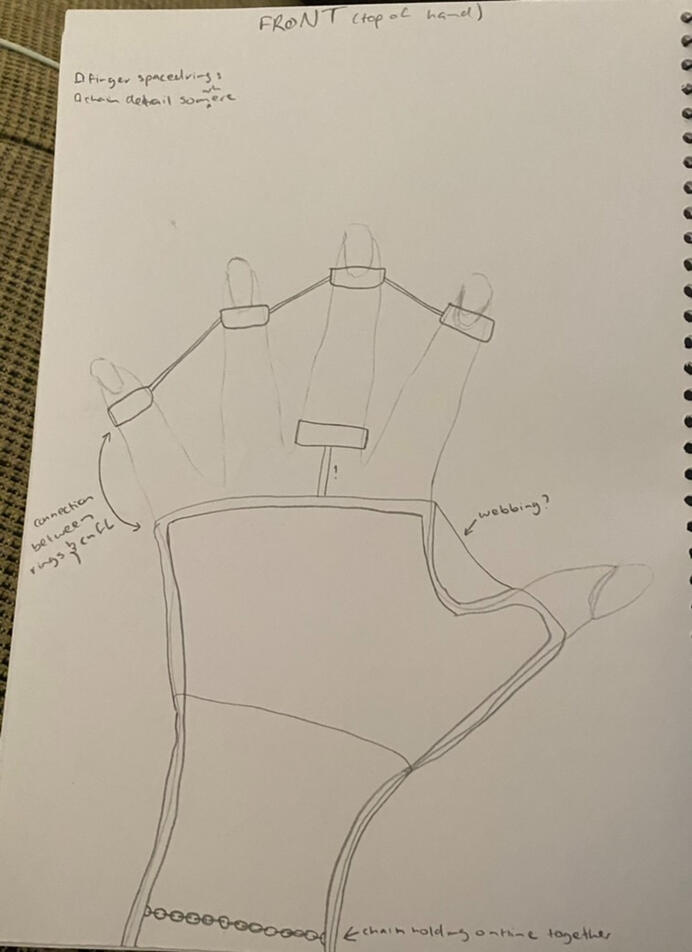
After presenting my proposal I went into the jewellery studio with he intention of casting my ingot to roll out into sheet, but I didn't end up going this as I got caught up thinking about my design and finalising it through speaking with Rhonda. I worked out how I'd like to move forward, by making 3 separate cuffs for my wrist, knuckles and thumb before joining them. The silver rings design was set in place so that wasn't something I had to consider.
11-05-2023 (my dad's bday!)
Today in the tutorial we worked on making a brass ring, and I used those techniques to make the thumb aspect of my wrist cuff. After that was over I got Rhonda to help me with recasting my silver into a more usbale ignot.
16-05-2023
Today I went into the studio to work on rolling out my silver ingot, but I didn't get as far as I wanted. I think I rushed the process and didn't reanneal enough which stressed out my metal, causing cracks to form. I got some other things done/started though.
Because my silver wasn't working out very well, I started working on some back up options, including rolling out some brass wire to see if that would flatten out enough to be usable (it didn't).
18-05-2023
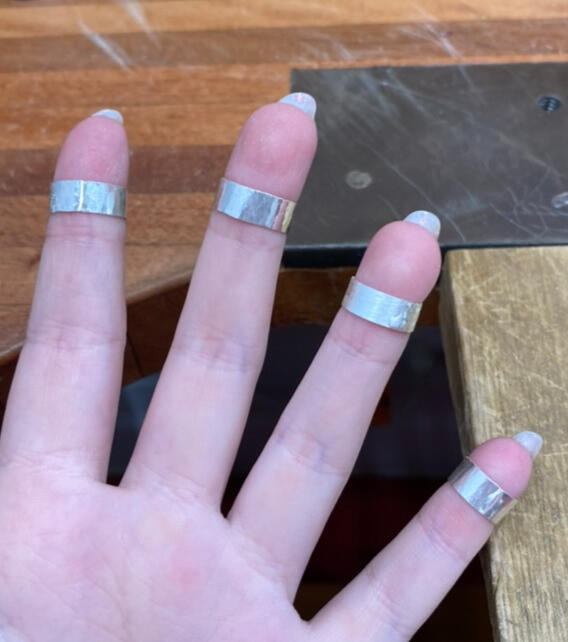
Today I finished the base silver rings for the ring aspect of my piece.
23-05-2023
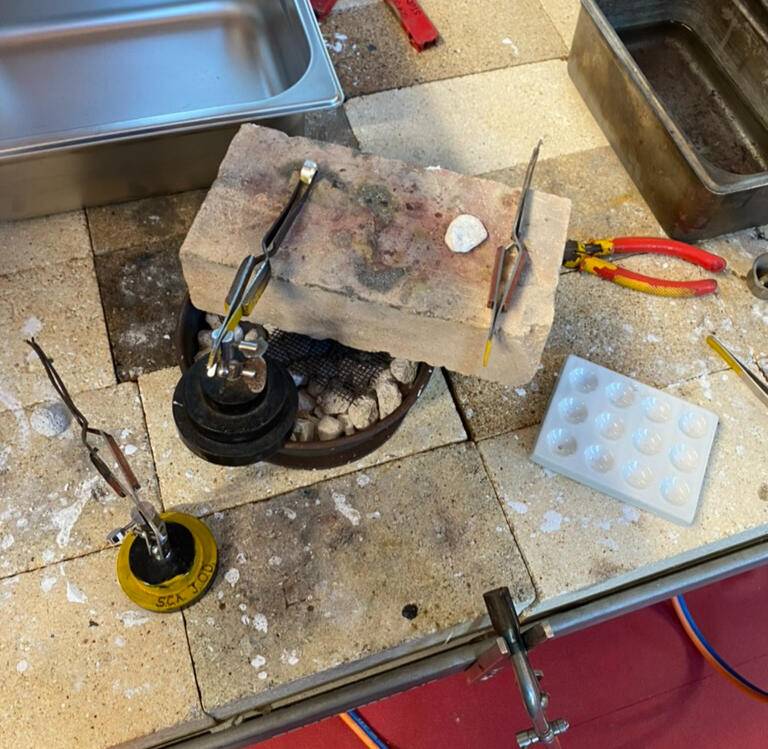
I worked on soldering my rings together with the wire today, which lead to some very interesting soldering setups. I connected the wire to my first, second and third finger ring, before connecting the pinky and ring+wire together. Then I connected to the first ring+wire with the middle finger ring+wire. This was rather challenging because once I managed to get the solder to run, the wire connected to the middle finger fell off. I was struggling to get the whole piece warm enough and focussing my heat on one section too much.
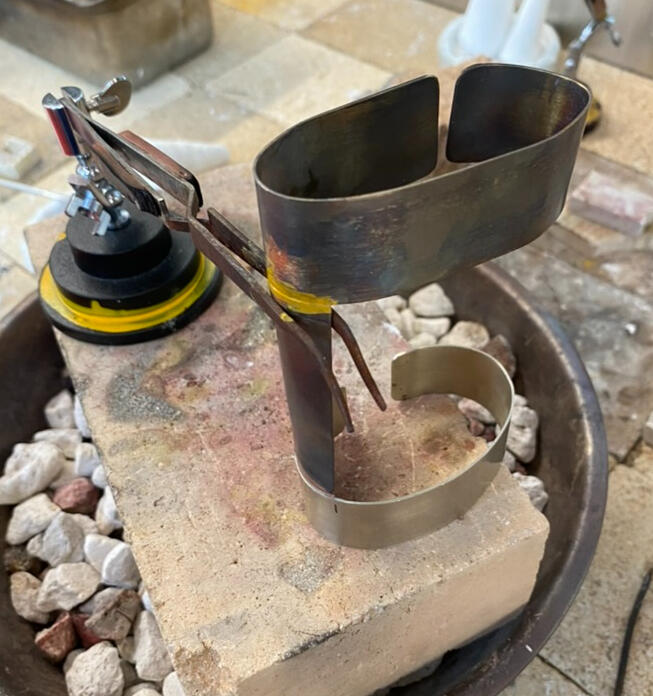
I also in this session looked into materials for my wrist cuff. Sterling silver was going to be FAR too expensive, so Rhonda suggested silver nickel, which had a similar cool-toned colour but was slightly darker and had different properties. She gave me a sheet that was 15x20cm (the perfect amount) and I marked out 6 strips each 2.5cm and cut them on the guillotine.
25-05-2023
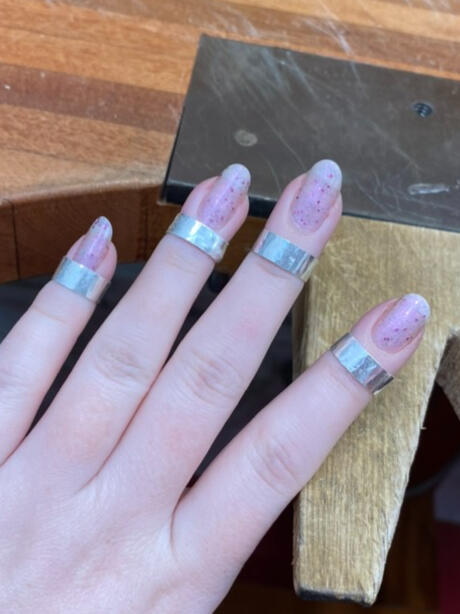
I soldered the two ring pieces together to create the final ring set. I didn't get photos but I have these two videos of both the set-up and the final product. (don't mind the rude words lol I was very stressed haha) I was super nervous about moving the wire too much so soon after soldering it so left it like this, but in the coming days I twist and manipulate the wire a little bit to make some of the rings fit better on certain fingers.
During this class I cut down the silver nickel for the wrist and thumb cuff, prepping them both.
29-05-2023
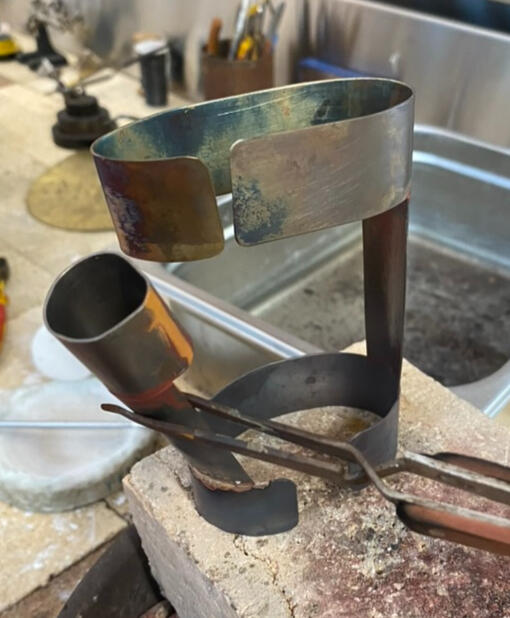
I went in this afternoon to try and smash out as much as possible and got quite a bit done. I started by soldering the thumb cuff, and whilst that was pickling, I got RHinda to help me mark out the lengths I needed for my joining pieces. I sued the guillotine rather than cutting them with the saw as it was taking wayyy too long that way. I annealed them and began working on getting them to curve enough to match the 2 cuffs they joined. I soldered one of the joining pieces to the knuckle cuff, with Rhinda's help as I was still struggling to heat the whole piece evenly. I shaped the other pieces but might need to adjust the piece joining my thumb and knuckle cuffe as that is an awkward space the I haven't quite worked out.
31-05-2023
I went straight into finishing soldering all of my pieces, using Rhonda's help to keep everything hot. I decided in the end to leave out the joining piece between the thumb and knuckles, as it was going to complicate things even more and I was struggling to shape it correctly anyway.
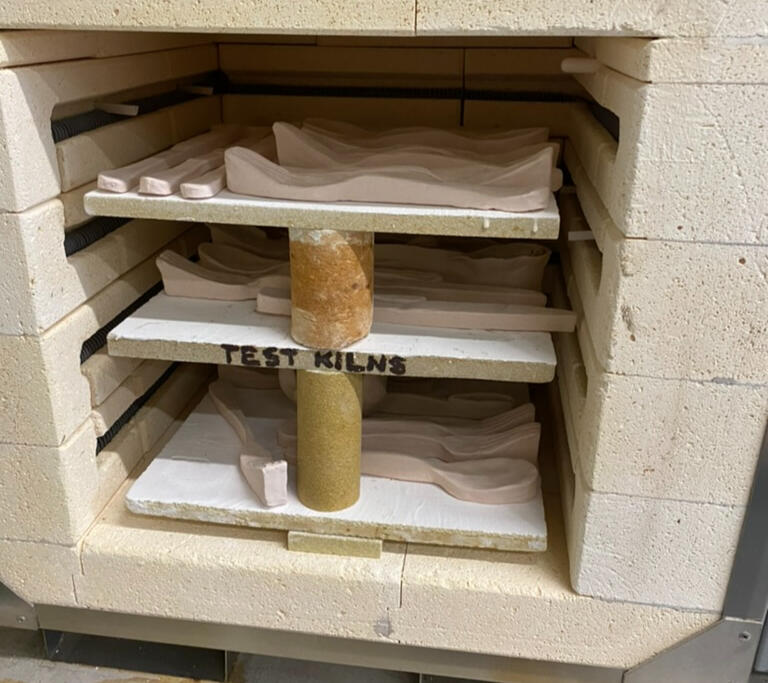
23/02/2023:
Demonstration of the slip-casting process
- holding mould together with elastic bands and pouring slip
- working out how long to leave mould to process/absorb excess water
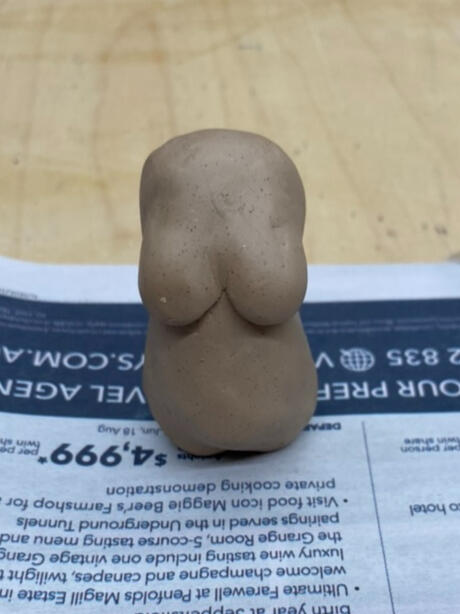
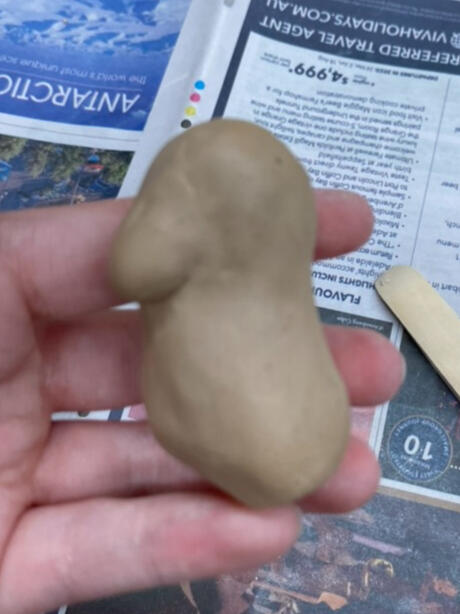
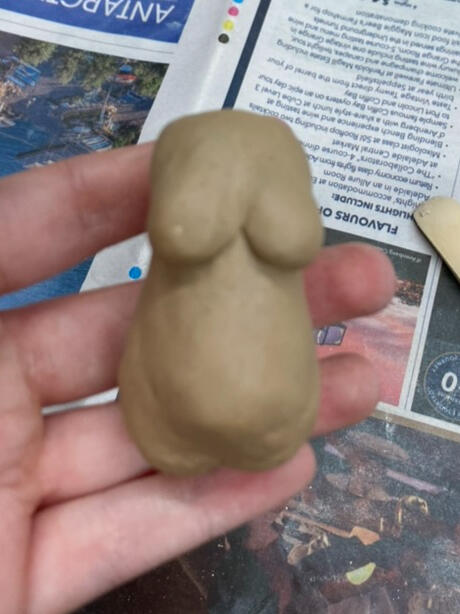
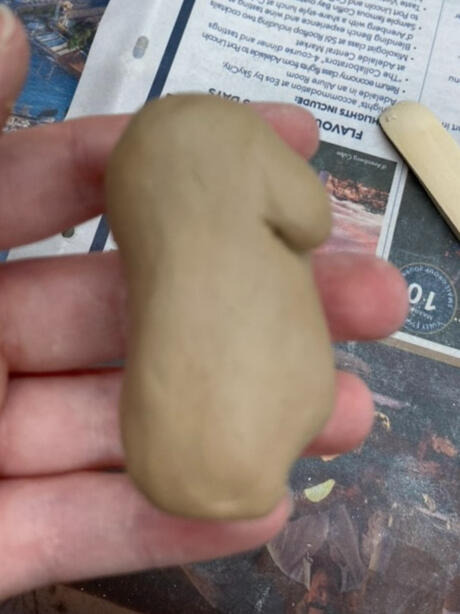
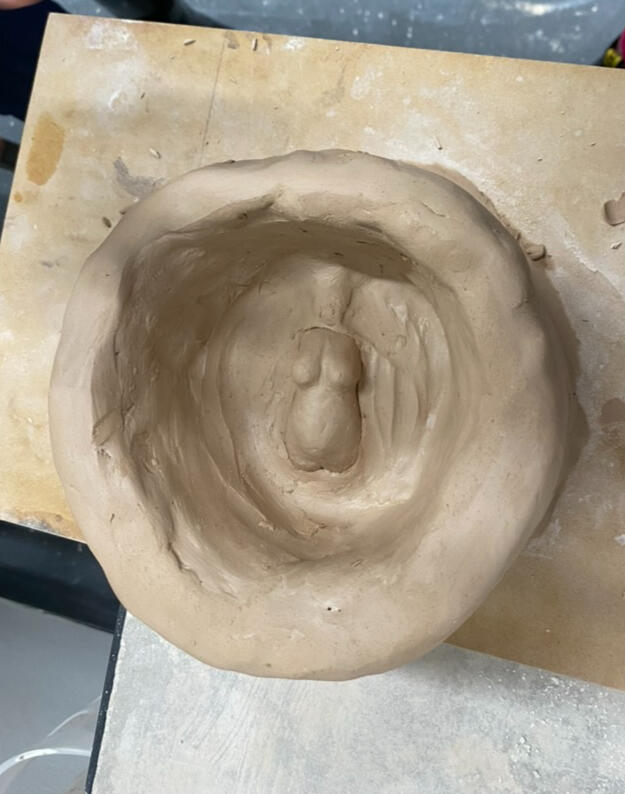
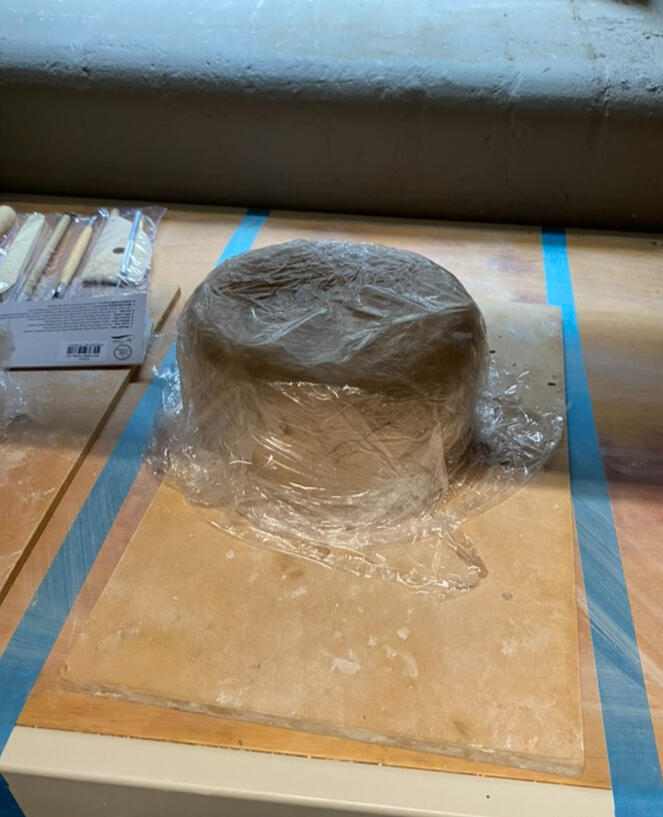
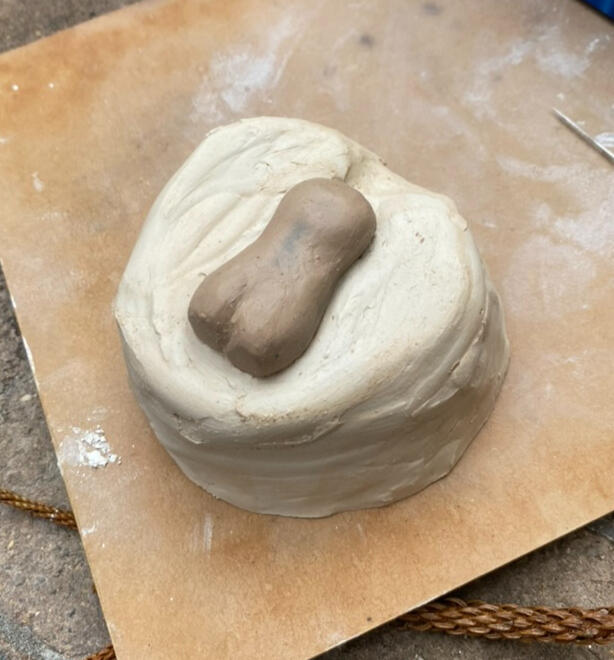
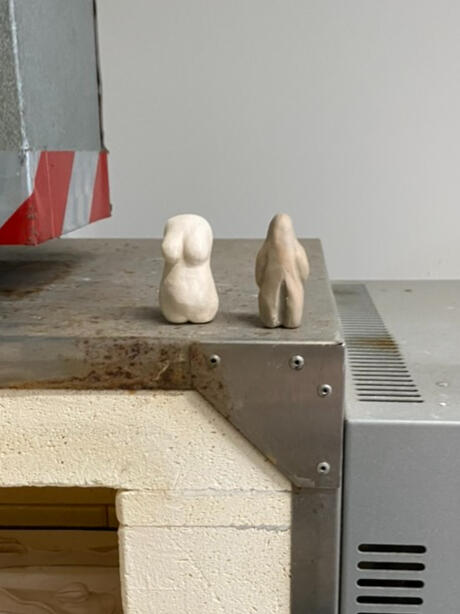
- pour out any excess slip and leave to drain/process furtherThen we began making our own mould, starting with creating a shape/form out of clay and beginning to build up walls to make the plaster mould. Essentially making a mould for the mould.The object had to be palm-sized, and in next week's lesson I'll bring cutlery to make the mould for my actual assignment, but I figured because I'm making my artwork around feminist art, making a female body seemed appropriate. When making the base of the plaster mould, the body had to be submerged halfway, almost buried. I found it a bit difficult to wrap my head around but Allegra really helped explain the process to me. The pouring spout was made and the walls had to be tall and thick to make sure the plaster wouldn't break them. I'm hoping I've done it right, the last photo is of it all wrapped up ready for next week.

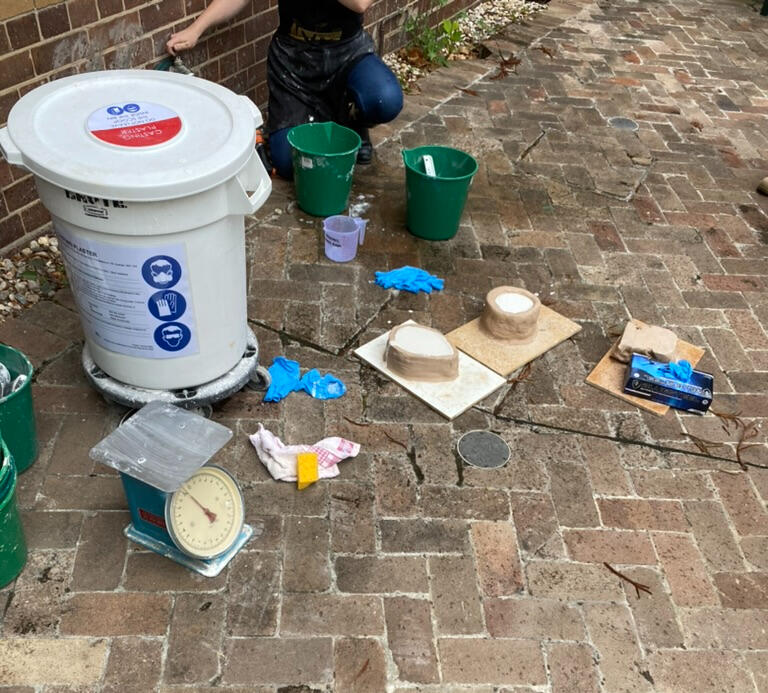
02/03/2023:Demonstration of plaster pouring
- prepping piece with liquid soap to avoid plaster sticking to the object
- working out the amount of plaster needed (1:1.3 water-to-plaster ratio)
- mixing plaster with hands
- pouring into mould and leaving to dryI poured into what I made last week and left it for 15 minutes before it rapidly firmed up. Whilst that was drying up, I worked on the mould I needed to make for my studio assessment.When that was dry we peeled back the clay from around the outside, the next step would be to make the opposite wall, but I left this step to work on my assessment instead (more on this process in the assessment tab). Allegra stayed back after the class was well and truly over to help me pour that today so that I could come in tomorrow to continue working on it and hopefully begin making some sets.
09-03-2023:STRIKE
16-03-2023
I'm hoping to finish up pouring the other side of the body mould, and begin making a set from my cutlery mould in today's class.
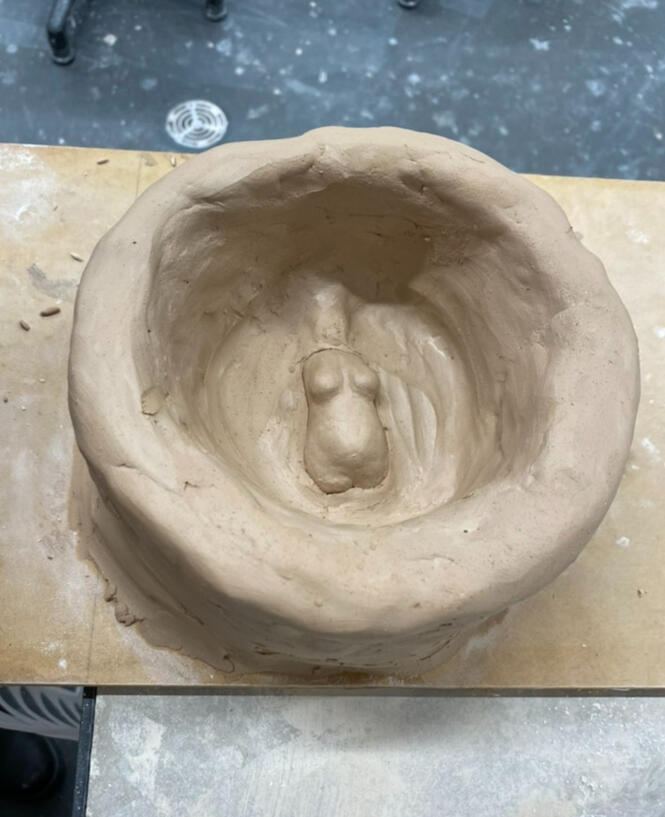
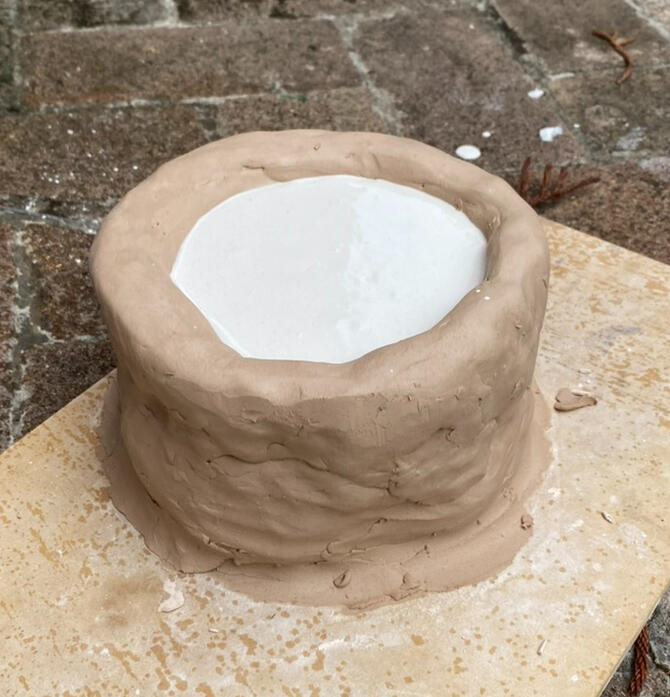
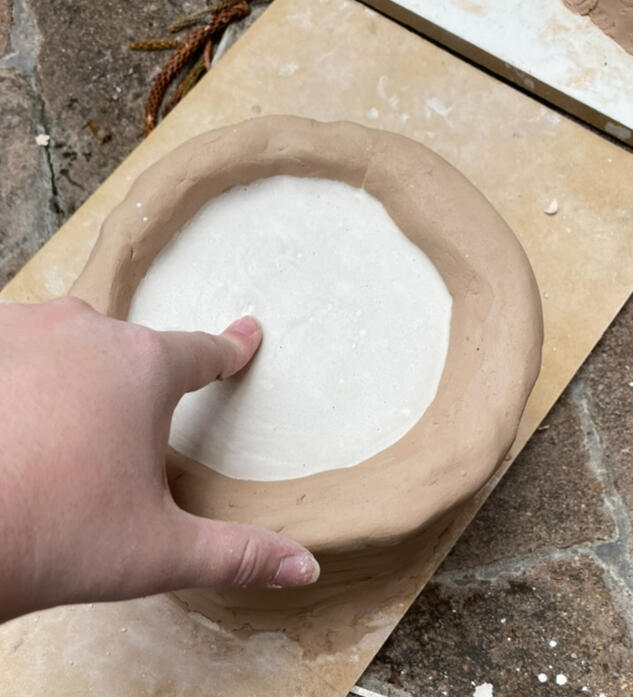
So I did end up pouring into the other side of my mould, though I made it slightly too thin because I was sharing the bunch I mixed with someone else and didn't want to use too much. (They ended up having too much plaster, but it had started to thicken and I didn't want to mess with the consistency)I ended up taking it apart anyway rather than repouring it, as I wanted to leave relatively on time today. I think it should still be fine, and if not I still have the body form if I needed to remake it. I'm not too fussed if it doesn't work out so well, as this is just an experiment in mould making, but if it does work out I'm potentially thinking of using it in my Judy Chicago set of cutlery.I, once again, was too caught up in what I was doing to remember to take many photos, but here is the before of when I went to pour the other side.

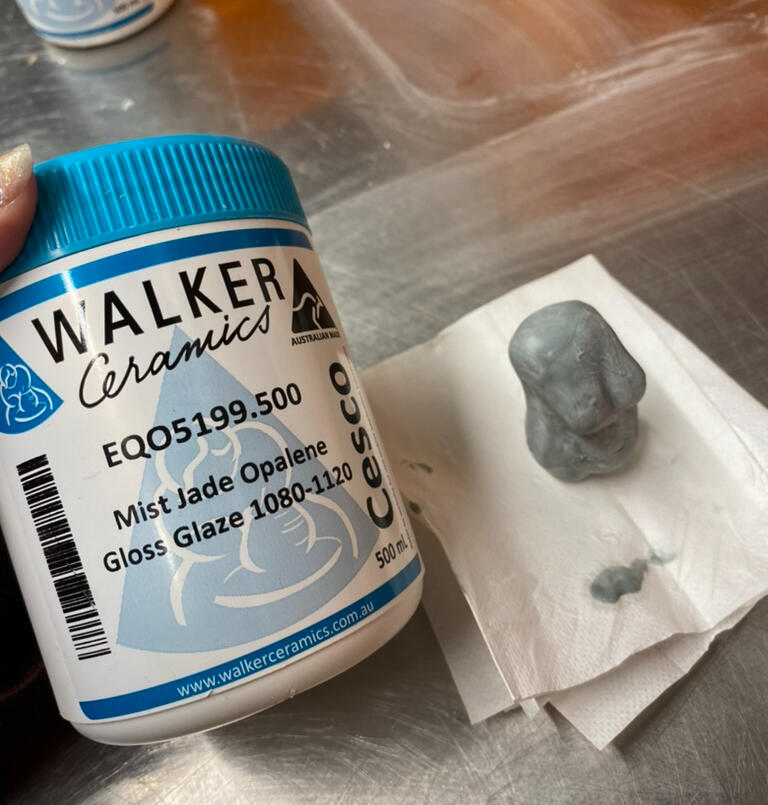
30-05-2023
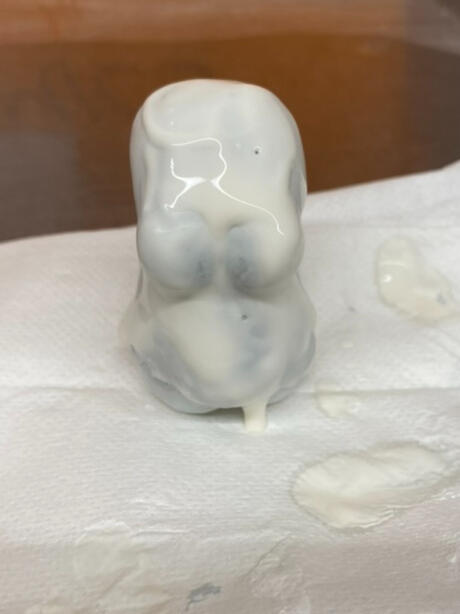
This was the first tech class where I put in a little work on something other than my assessment, and I glazed my small body form from above, as it was intact when I removed it from the mould. I had put it in to be bisque fired a little while ago, so today I looked at the glaze.I've never really glazed before, not properly at least, so this was just a little test. I chose to layer teo glazes to hopefully make something interesting, starting with "mist jade" and then "oyster white" on top.
My idea as of 21/02/23:
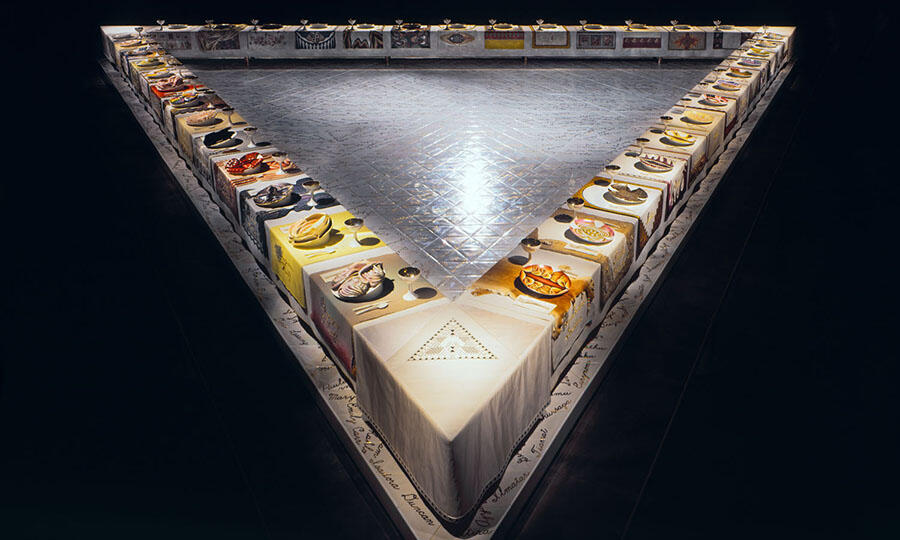
- series of cutlery sets inspired by 'The Dinner Party' (1974-49) by Judy Chicago
- could tie into glass elective, shift dinnerware's traditional materials (instead of ceramic plates, silver cutlery and glass cups, there would be glass plates, ceramic cutlery and silver cups)
Research from 24/02/23:General Info from the Brooklyn Museum website:
- The centrepiece for the Elizabeth A. Sackler Center for Feminist Art
- Ceremonial banquet
- Each setting commemorates important women from history
- Embroidered runners, gold chalices and utensils and china-painted porcelain place
- Motifs of vulvar and butterfly forms
- Each set is made in styles appropriate to each individual around the table
- Additional names are inscribed on the white tile floor belowElizabeth A. Sackler Center for Feminist Art Genisis:
- The initial concept was “to teach a society unversed in women’s history something of the reality of our rich heritage.” (Chicago, Beyond the Flower, 45)
- Originally conceived the idea of 25 china plates hung on a wall, titled ‘Twenty-five Women Who Were Eaten Alive’
- The title referenced the ways women had historically been “swallowed up and obscured by history instead of being recognised and honoured.” (Chicago, The Dinner Party, 8)
- Came to the idea of displaying the plates on a table when visiting the home of a professional china-painter
- The dinner table is a symbol throughout women’s history
- the place upon which the meals women prepared were served; and it was located in the private, domestic, “feminine” space versus the public, “masculine” one
- Drew inspiration from Leonardo da Vinci’s ‘The Last Supper”
- “I became amused by the notion of doing a sort of reinterpretation of that all-male event from the point of view of those who had traditionally been expected to prepare the food, then silently disappear from the picture or, in this case, from the picture plane.” (ibid)
- The table shape becomes a triangle instead of a circle due to the significance of the shape for both the artist and as a symbol of femininity
- Three balanced sides represent an equalized world and the goal of feminism
- The goddess symbol
- The number of women was also a reference to the last supper, with 13 women on each side
- Also a reference to a witch's covenFurther:
- The lighting in the room was set in a way to make each of the 39 places look like an altar
- Over 400 volunteers worked on the piece, becoming a testament to the power of feminist vision and artistic collaboration
- The plates became more 3 dimensional during the procession from prehistory to the present to represent women rising
- More modern women with 3d elements on the cutlery whereas more ancient women are kept 2d
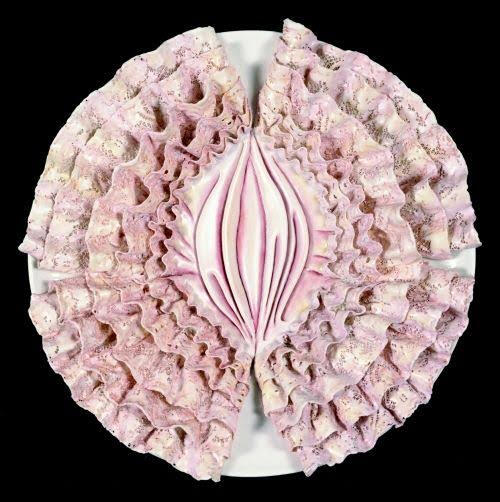
- During the time it was created the likeness to female genitalia was disturbing to audiences
- The artwork was harshly criticised for this resemblance, called things such as ‘3D ceramic pornography by the US Senate
- When she attempted to donate the work to the University of the District of Columbia the senate threatened to withhold funding for the UDC
- As an art and feminist educator Chicago encourage women artists to make artwork with images that were anti-phallic
- Chicago believed that central core imagery which celebrated feminine eroticism and fertility could be used to challenge patriarhcal constructions of women
- Embrace materials traditionally associated with women’s crafts
- Embroidery, weaving and china painting
- Years of research went into the construction of the piece, and when the work was opened it was accompanied by a book and documentary
- Plates were meant to be metaphors rather than representations
- Georgio O’Keeffe’s plate resembles genitalia and the reproductive systems of flowers, which references her famous abstracted paintings of flowers
26-02-2023:
Based on that research, I can take my assessment in a few different ways:
1. 39 sets of cutlery (unlikely, would require too much time and research as I'd want to do the women justice)
2. 25 sets of cutlery to reference her original title "Twenty-five Women Who Were Eaten Alive" (less unlikely, but depends on how long it would take me to make sets of cutlery) {This is the idea that I like the most, as the title really appeals to me, but realistically in 6 weeks it's not really achievable.}
3. 13 sets of cutlery to reference the number of women on each side of the table, The Last Supper and a witch's coven. (This is the most likely option, but I am still slightly worried about how long it would take me to make the slip casts/mould. I'd have to speak with Allegra)+ My brother (of all people) also mentioned the resemblance to The Knights of the Round Table which is very interesting and I could look into further, or at least is an interesting parallel with Chicago referencing The Last Supper
07-03-2023
Since hearing the feedback given to me after my presentation from Jan, I've decided to remove one of the women from my list and instead add Judy Chicago herself. Whilst Chicago isn't an overlooked woman from history, her impact and contributions to feminist art and education are wildly significant.Research on women is finalised and under the button above.
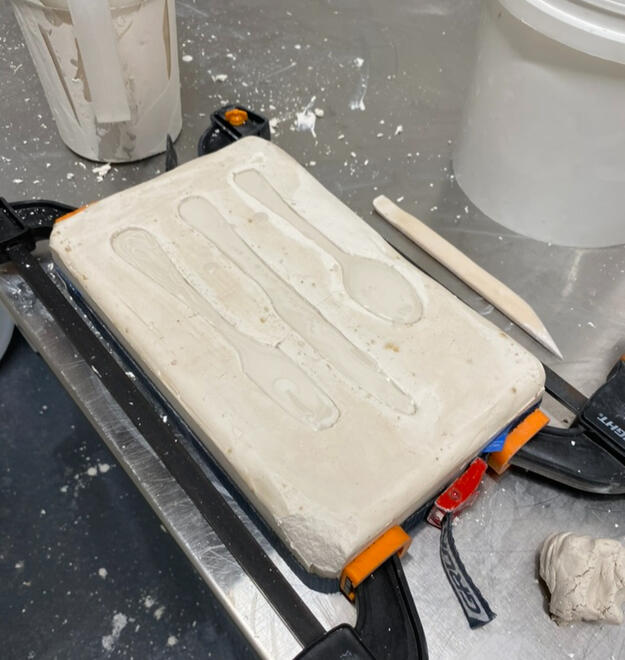
Progress:02-03-2023:
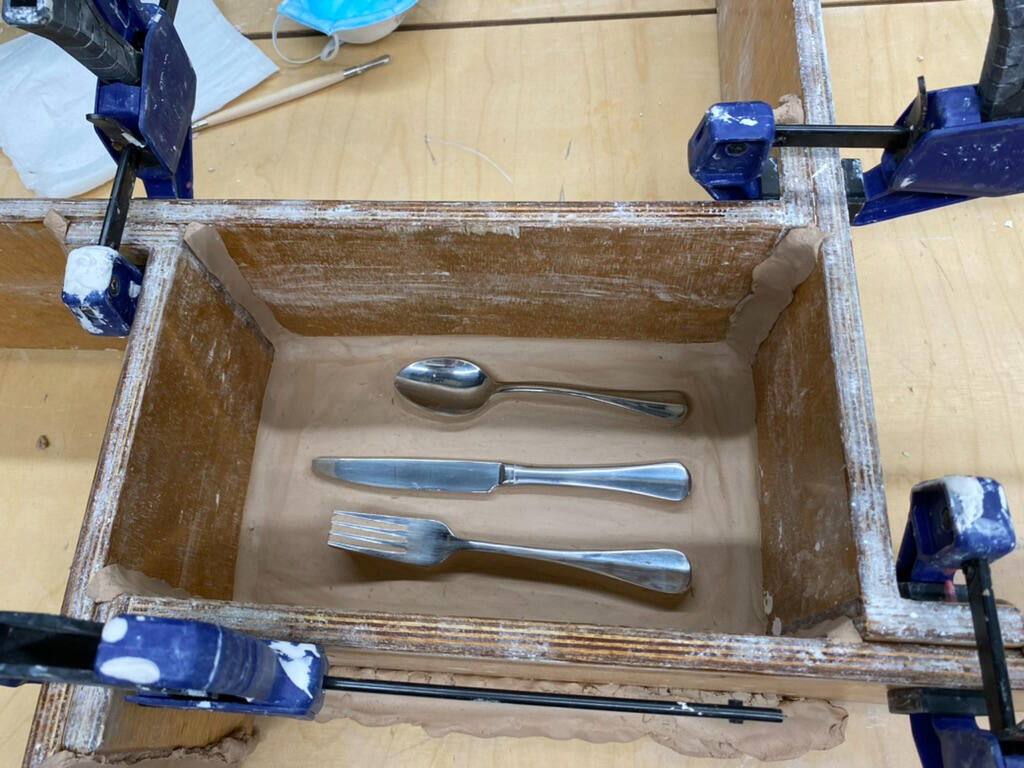
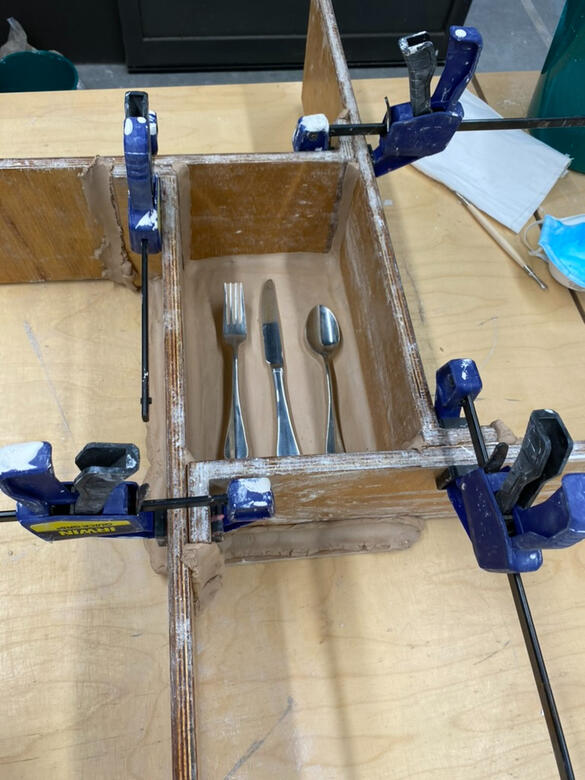
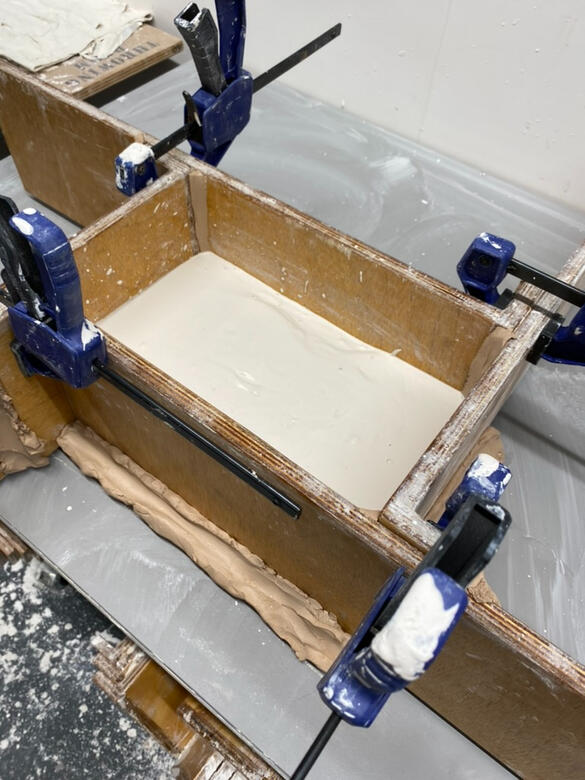
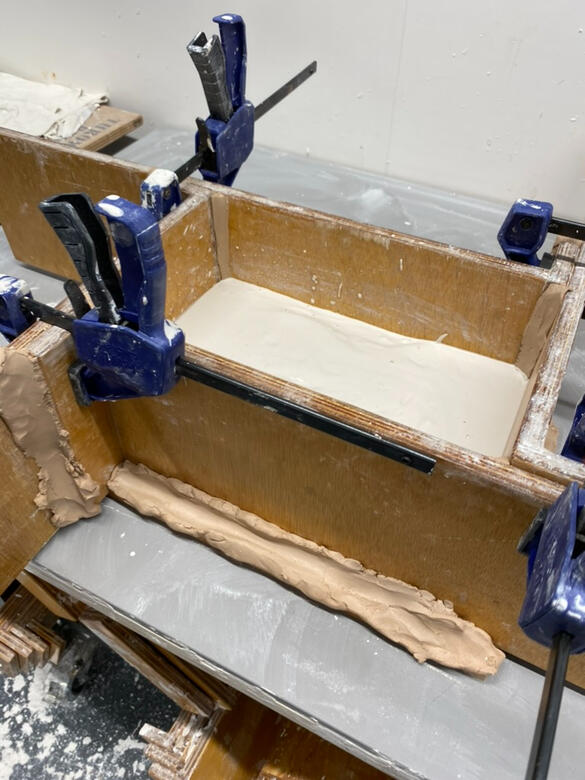
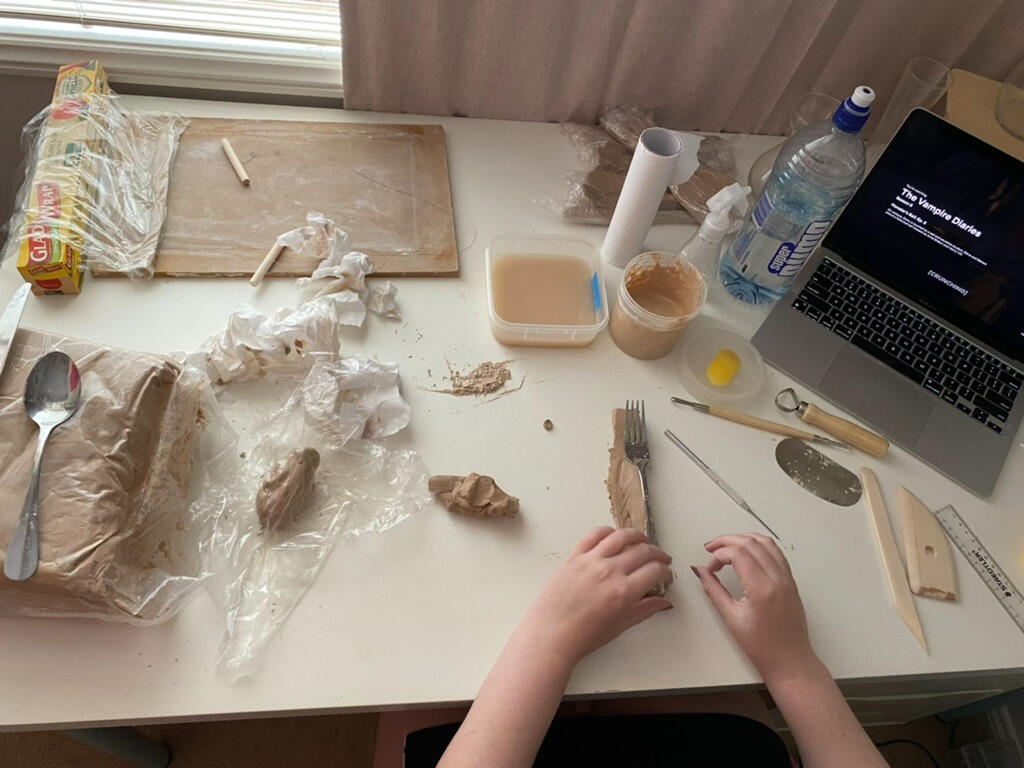
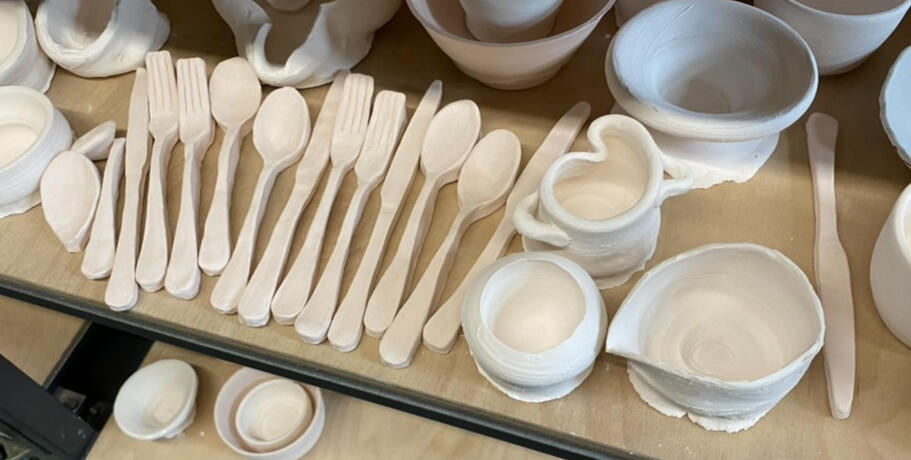
I began making the mould for my cutlery sets today. I spoke with Allegra about the best way to go about doing this, as I originally planned to use slip casting. Based on her advice I've changed to making a push mould due to the fragile nature of the cutlery set I'm using.When constructing the mould, to make it slightly easier to handle it was best to add depth to the utensils which would make them easier to handle. I decided to exaggerate this depth as a stylistic choice, and if I end up hating how it looks in clay then I can always trim this back.When I was making the mould I was somewhat rushing as I was already staying back after my tech class to start it and I wanted to be able to pour the plaster that day so it would have ample time to pour. As a result, I forgot to take photos of the mould before I put the walls up around it, as you can see to the right. You can still somewhat see how the utensils are raised.
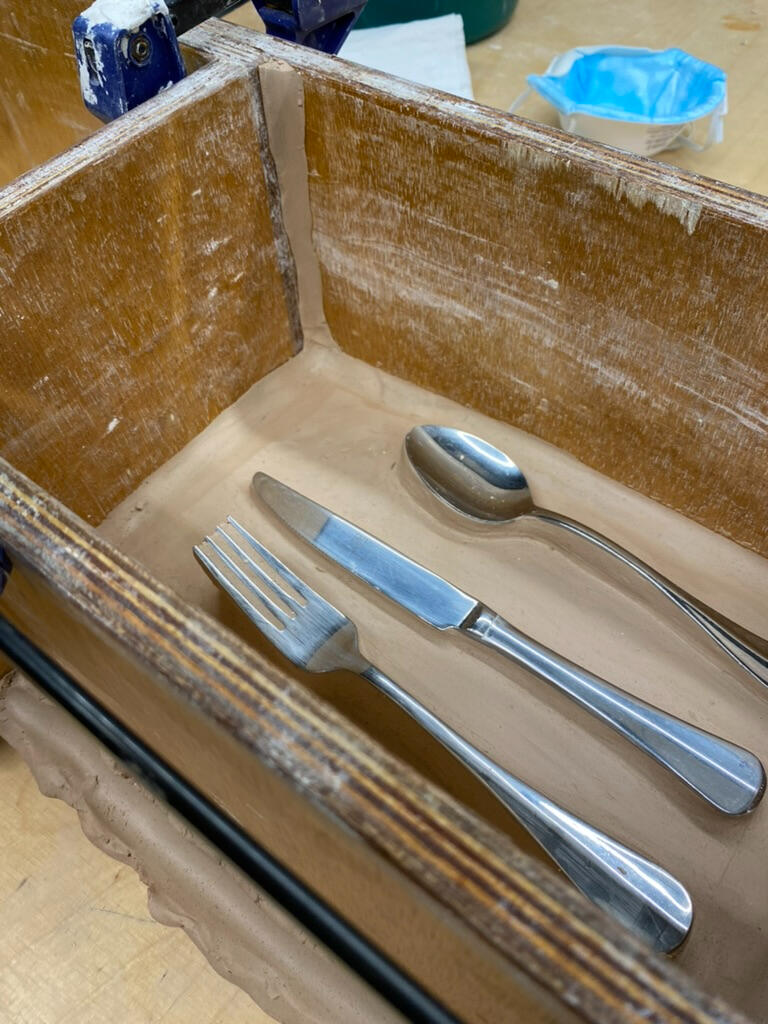
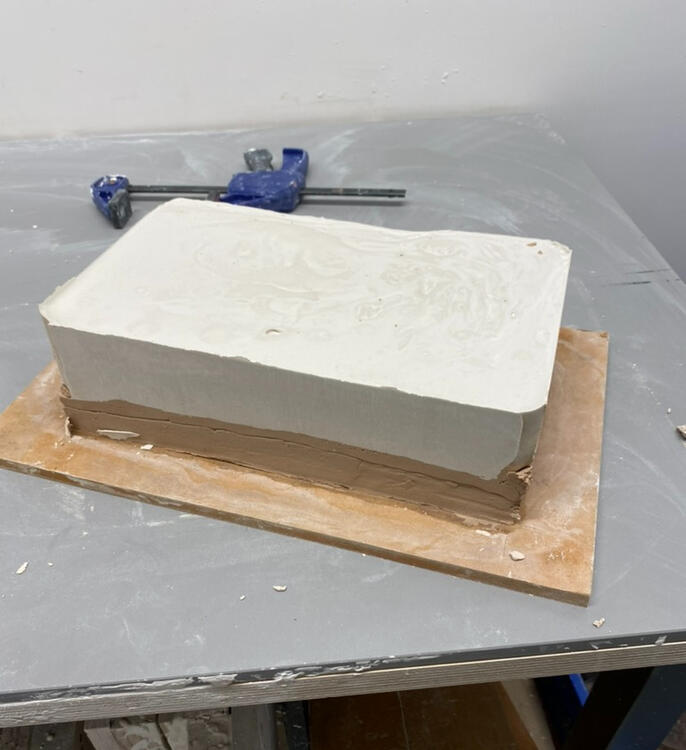
To make the mould I first started with an empty wooden board and made a slab of clay that took up the whole bottom essentially. It was mostly flat, but I wasn't too concerned with that as I will end up having to touch up the utensils anyway. I built up the underside of each of the utensils to give them height, slip and scoring them to the base slab before making sure the joins and connections were smooth. I trimmed the sides of the slab so that I could make sure the wooden slat walls could sit flush against the slab. From there Allegra helped me assemble the wooden walls and clamp them before I reinforced every join to make sure the plaster didn't run.Once that was ready Allegra helped me work out the maths for mixing the plaster and I mixed it up. the slab ends up being about 30x18x7 cm and we mixed a total of 4.6 kg of plaster (2L water to 2.6 kg plaster). We used the mould-making room so the exhaust was on and I mixed it all up and poured it in. Tapped out all the excess air bubbles with a mallet under the table and left it there to cure. I intended to go in on the 3rd to do some more work on these, but due to this only being completed at about 5 pm and some other obligations that came up on Friday I couldn't make it to campus. I feel a bit bad about this as I'm stressing about how long it's going to take me but realistically, it just means the mould has a better chance of setting properly so that when I go in on Monday I can actually get to work making some cutlery sets.
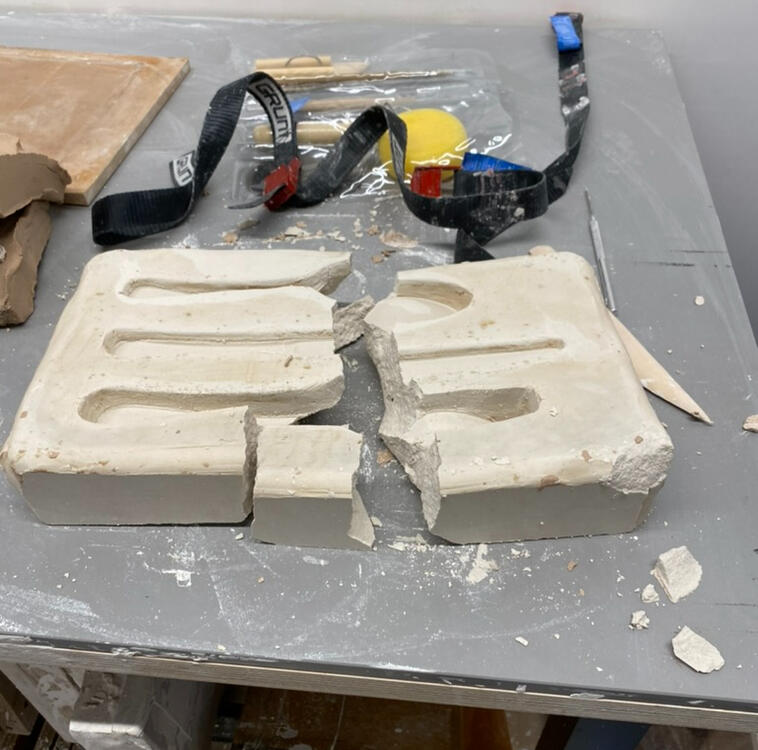
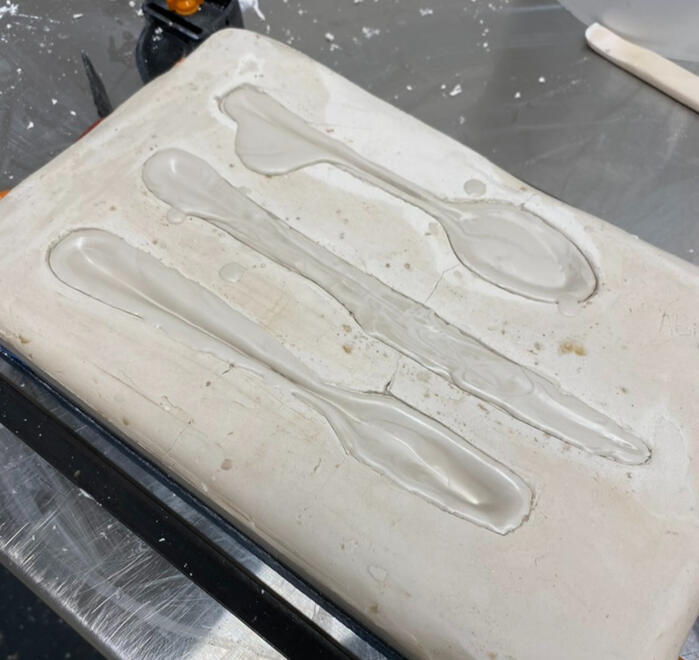
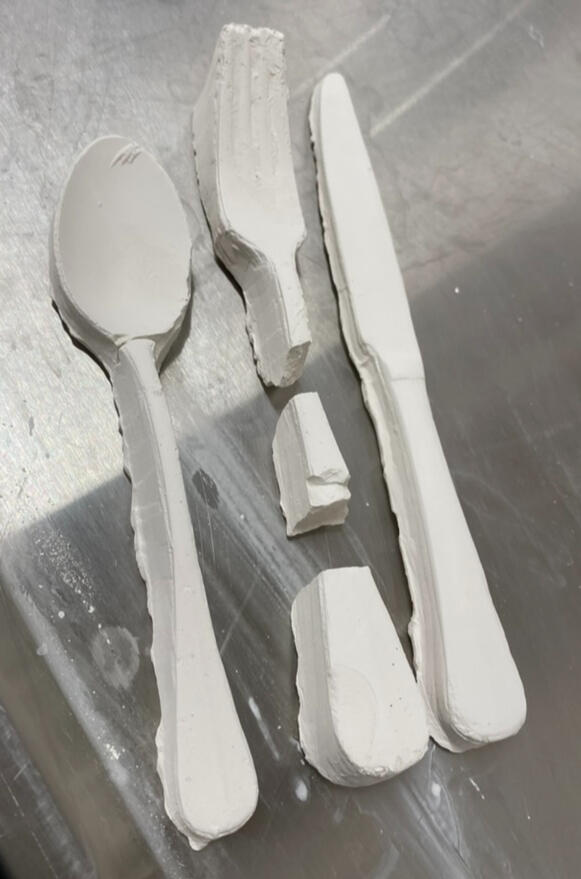
08-03-2023
I dedicated this whole day towards making my cutlery sets, however, there were some HUGE issues that arose that have resulted in me changing the way I go about constructing my work.I came in this morning and began demoulding the plaster. It was dry on the back but still a bit damp from where it was pressed against the clay for almost a week. I had kind of assumed it would be demoulded in my absence but I can understand why it wasn't. When trying to remove the cutlery, I broke the plaster mould. I know. very dumb. I called my mum and had a bit of a cry. Allegra wasn't in today so I didn't have anyone I could ask for help. I knew that realistically the best decision would be to start my mould again, but that is too long of a process considering there are only just over 2 weeks to go and I really need my sets out and ready this week. As a result, I just clamped the mould shut and did a small test to see if the slip would leak. It didn't. I made some small changes to the mould to ensure there were fewer complications in getting them out of the mould and left it to dry for about an hour.It still wasn't dry (which I was expecting) and I poured some slip into it to do a test to see how long it would take to dry etc. I checked it after an hour and just under an hour after that, adding more slip if it thinned out.Because this was such a lengthy process, it was looking unlikely I would get the desired amount done on time. I ended up deciding I'd rather take some clay home with me and hand-make the utensils the rest of the week and over the weekend. Because of the strike tomorrow that means I am at home, which I can dedicate to hand sculpting.
I poured slip into my mould to try and get an idea of how long it may take to set, knowing my plaster was still too wet and it would take too long but I just wanted to get an idea of time, and without Allegra there and having never used the dry cabinet I didn't want to do something wrong.I did this at about 11:50 and these photos below are in time order and show me topping it up and these are the time stamps.11:58 am, 1:13 pm, 1:15 pm, 3:04 pm
Going forward I know where I went wrong and how I would fix it in the future. I'd be much more careful removing the object I'm making the mould of, and I'd wait for the plaster to fully set before attempting to cast anything. I'd also come in sooner to do these things, leaving the mould sitting with the clay really did not help as all that moisture was absorbed and the plaster/clay shrunk around the cutlery. I'm definitely interested in trying this process again, however. I'll continue to work on this mould and the little body mould I made in the tech workshops.
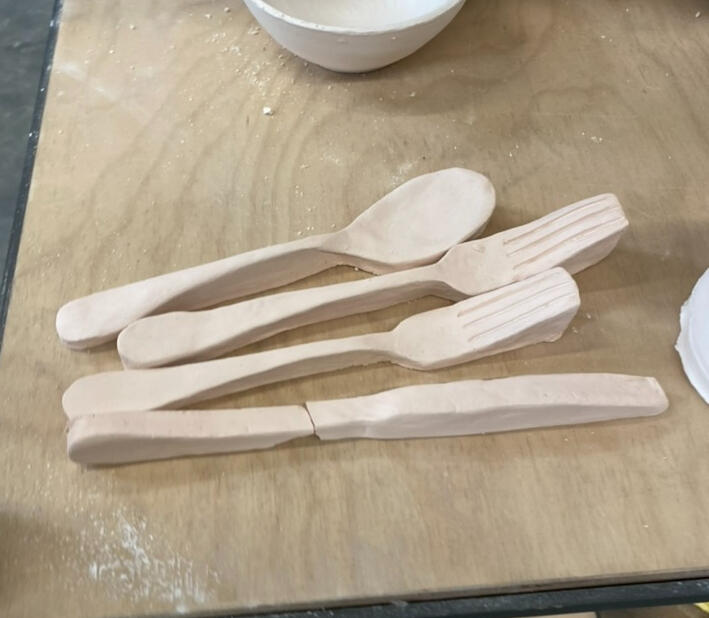
11-03-2023 & 12-03-2023
I dedicated this whole weekend to hand-building my backup cutlery sets, knowing it was highly unlikely I'd be able to make enough with my mould in time for my assessment.I didn't get a very good photo because I had messy hands, but this was my set-up for both days. I got 5 done on the first day (should have done more realistically but I got bored after a couple of hours) and the other 8 on Sunday. I started at about 10:30 on both days, not finishing till about 4 on Saturday and about 6:30 on Sudnat]y
15-03-2023
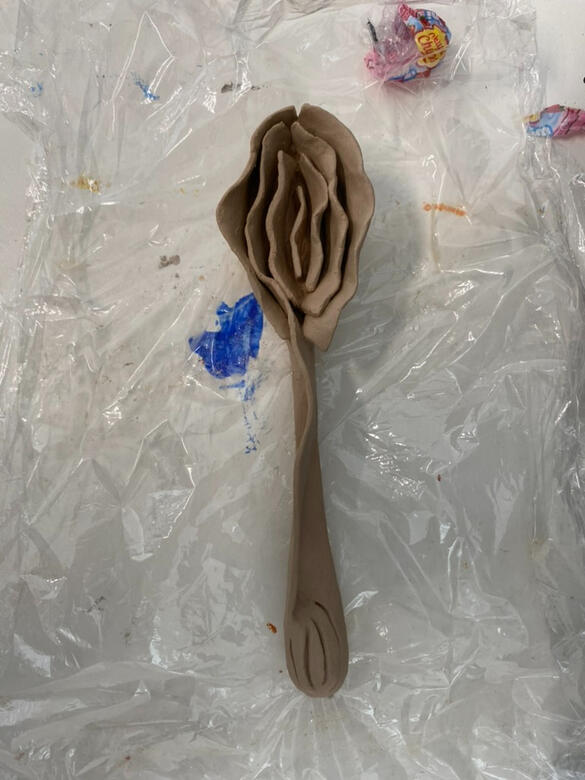
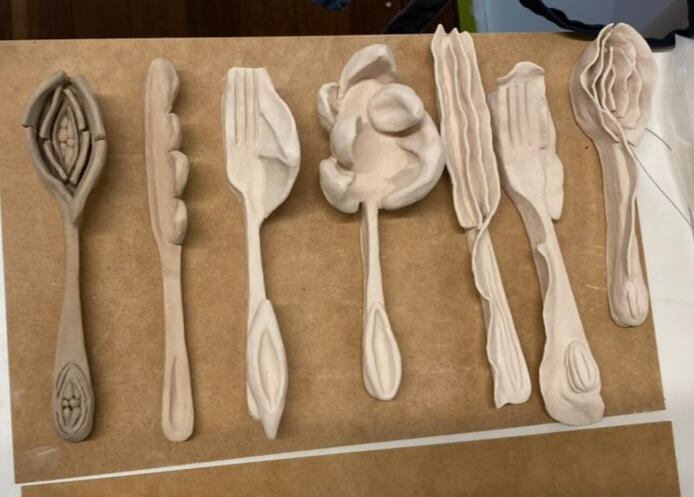
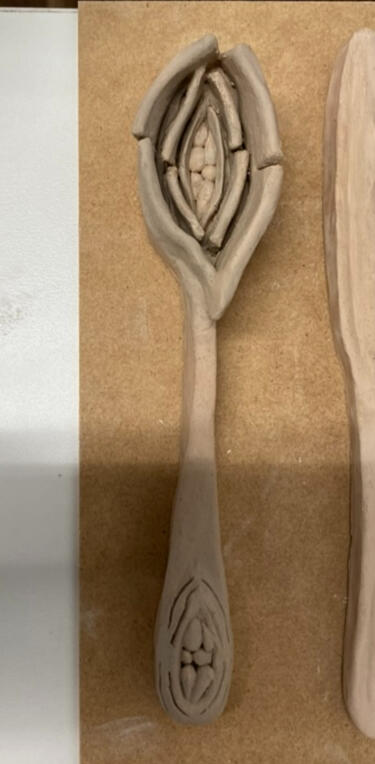
I came into uni today set on adding the 3D elements and hopefully getting them ready to put in the kiln this afternoon, but when I got to campus the building was closed due to a potential gas leak. I'm currently sitting on the floor outside the building waiting because it's such a long trip in I don't want to go all the way home only for them to say it's ready. Even though it has now been 40-50 minutes and nothing had changed.We were allowed in at about 11 am, and I went straight to my studio to start working on adding the 3D elements to my cutlery sets. I originally planned on finishing all of them today, but I only got most of one set done. I worked on the Emily Dickinson plate first as I knew the thin frills would take a lot of consideration and I already had some ideas in mind prior to today. Below are photos of the finalised spoon, and the fork I added another frill around the top layering with the one there but I don't currently have a photo, I'll add some later on.


Along with working on the 3D elements, I also began to prepare my plain sets ready to be painted onto, knowing they had to dry out significantly before they could fire. Allegra helped me pop them in the drying cabinet for some time where I checked on them every 10 minutes or so, flipping them to ensure an even dry. The photos below show some of that process. The last photo is how I left them for the night, as Allegra advised that while she could put them on for a slow fire it would be very risky, so I opted to leave them and let them air dry until Friday or Monday.
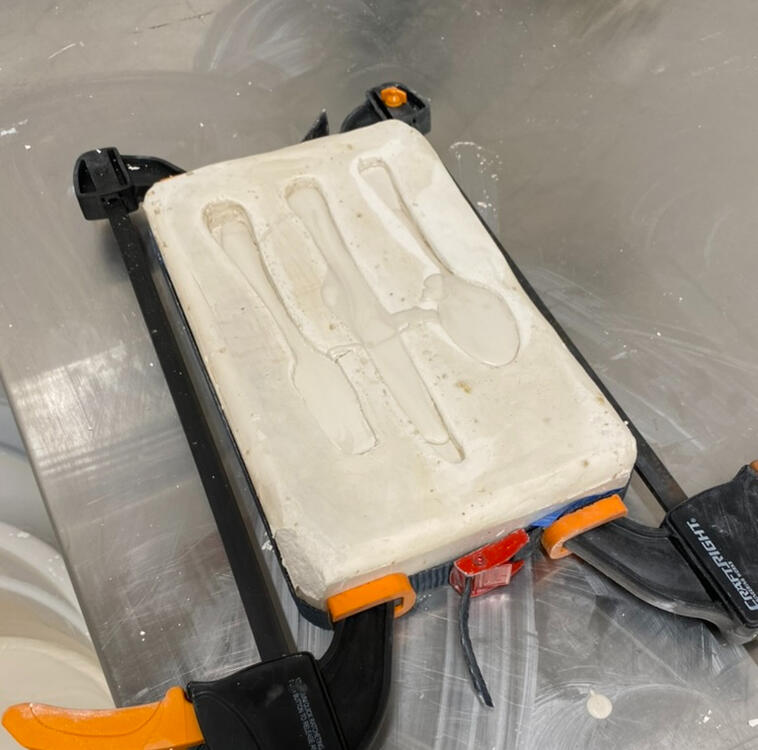
As well as both of the above tasks, I also checked on the set that came from my mould, which Jan managed to dry up enough last week. These are those photos. I'm thinking of potentially using the mould to make one good set for the Judy Chicago sets in my work, but I haven't quite decided. I also thought to use the mould for all the plain ones so they'd be more uniform, but I really don't have enough time even with considering getting an extension. They turned out quite well, though would still need refining. I also ended up accidentally breaking the fork because I wasn't supporting it well enough.


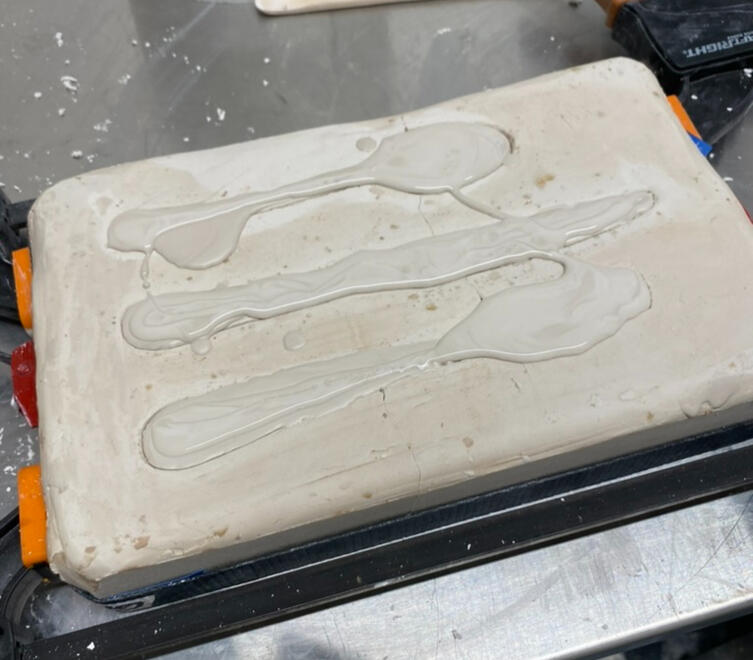
16-03-2023
During my technical workshop today, I used my mould to get a set of cutlery going. I'm hoping if they turn out well enough I could use them for my Judy Chicago set, but we will see. It is still taking longer than I would have hoped for the slip to set, even with a dry mould. It was in the drying cabinet for maybe 20-30 minutes towards the end of class and it still was not ready, so I've left it overnight as I intend to come in tomorrow to continue working on my 3D sets.
Update, I forgot to check on it 😭
17-03-2023
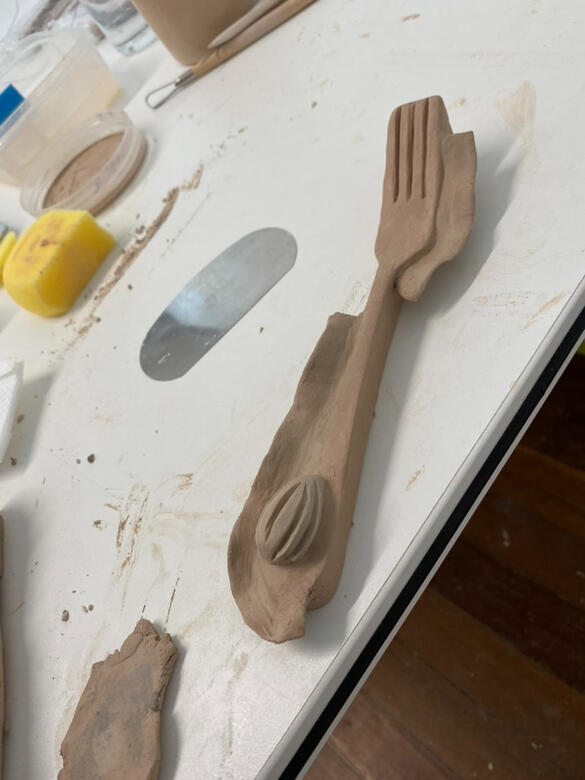
I came in again today on my day off to work on my 3D sets. I got in at about 9 am and finished off the knife from my Emily Dickinson sets before realising it was way too hot to be wearing black jeans so I had to go buy some shorts. That only took 30-40 minutes and then I started working on the Susan B Anthony set. I didn't have much of a plan for this one (which ended up being a small problem) So I just started on a similar vibe to the Dickinson one, with the spoon. That took me most of them the day, and by about 2:30 I was beginning to get a bit bored and unmotivated, and my knife from this set kinda show that. I didn't want to force my self to keep going as I through I might end up hating whatever I made because I was rushing it. My back was also getting very sore. Sore I left.I also did the fork and the knife, but I didn't get a photo?? I think I was super spaced out by this stage
I also spoke to Ali (Allegra was away) about getting my plain sets into a kiln for a bisque fire, so here's them all lined up and ready.
21-05-2023
I continued to work on my pieces, and spent the morning sketching out my ideas unlike with my other 3D sets as this would mean I'd have a clearer idea of what I was making when it came time for construction
Jan came around in the afternoon session, spoke to some of us in the studio spaces, and gave me feedback to carve out the underside of the neck on my pieces. I won't be able to do that because most of my pieces were already fired by this point, and the necks are already a weak spots on the utensils so they need the extra strength.
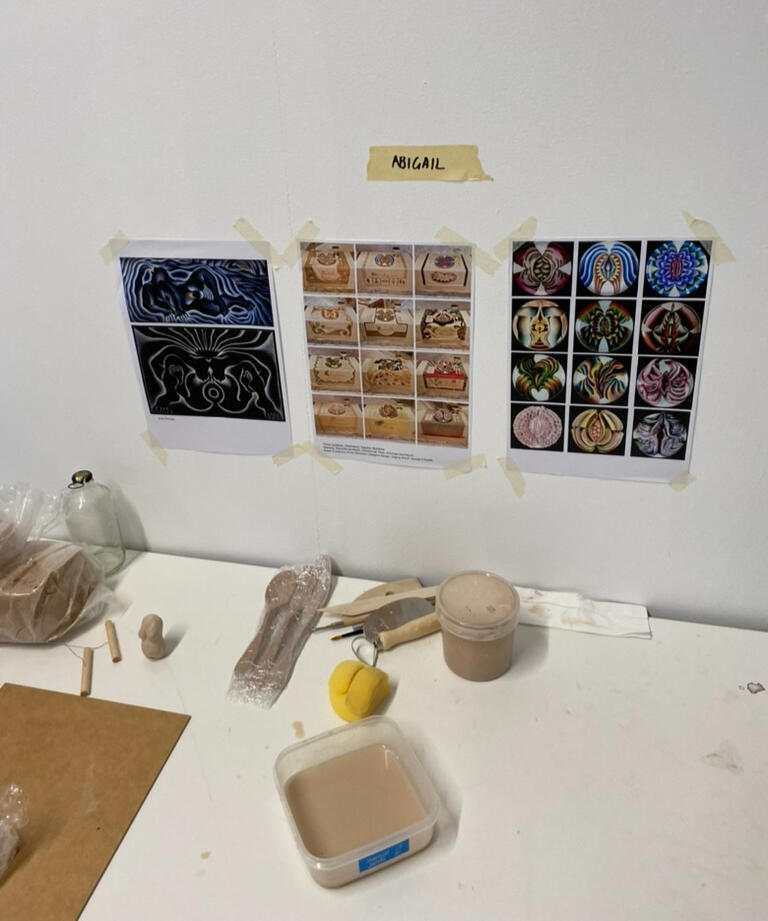
I got the spoon above finished this day.Also out up some stuff on my walls
22-05-2023
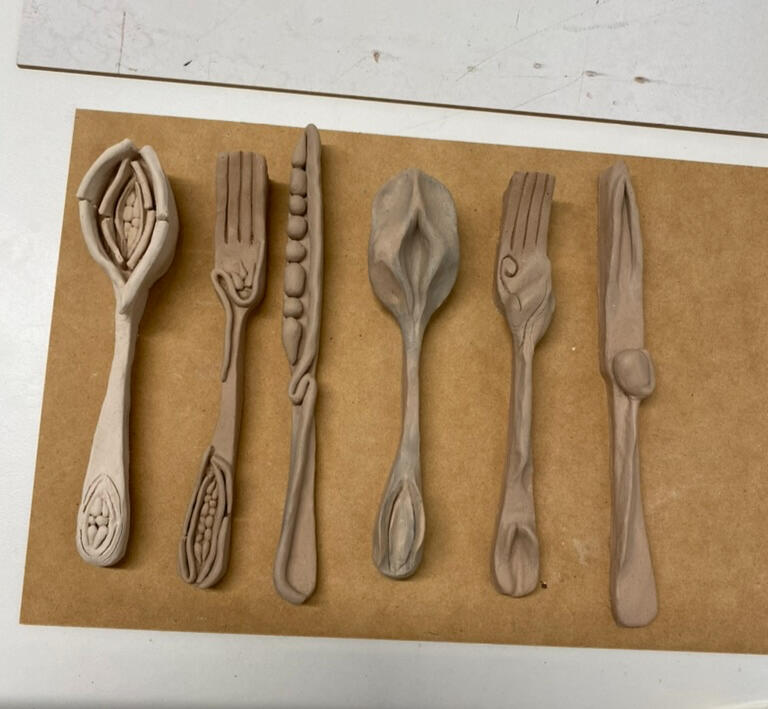
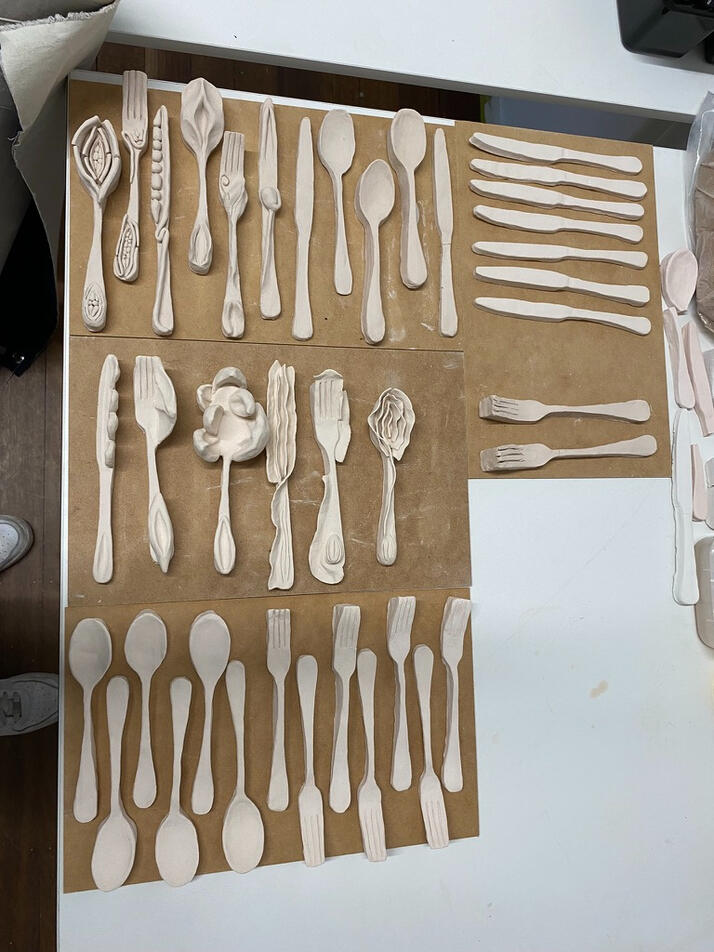
Came in today to continue building, and managed to finish off the rest. Because of the sketch I did yesterday, I had a much clearer idea of what I was going which made this process much faster. I left half way through the day to have lunch with my dad who was in the city for a few days, before going back to campus to finish off the final one.
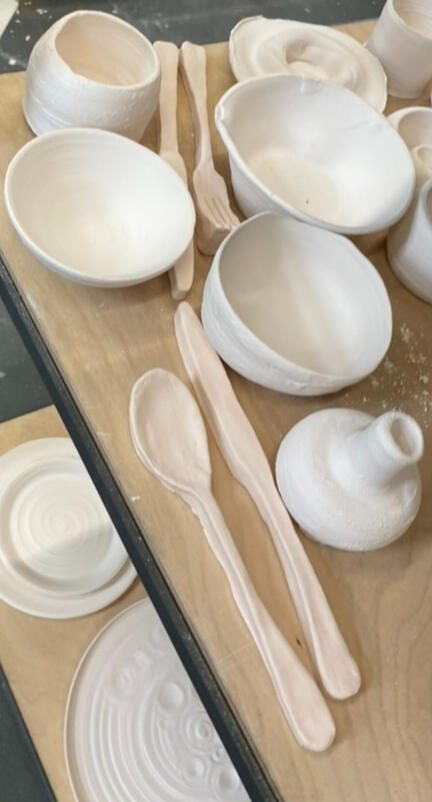
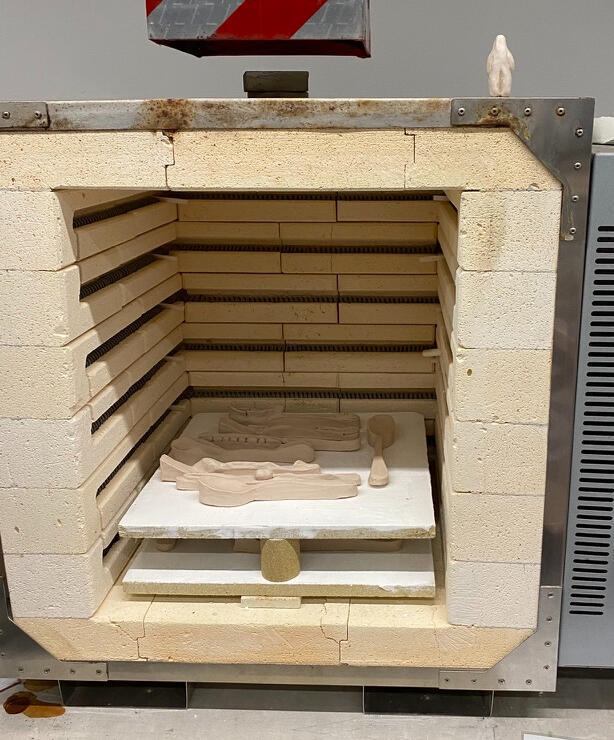
I also put the first set of dry pieces in the kiln for a full fire. I chose to do a full fire because I wasn't going to glaze them, so a full fire will make them a bit stronger. Plus a photo of my kiln god, as Allegra told me to include lol.
Plus my plain sets from their bisque firing, before they went in with the 3D for a full fire.
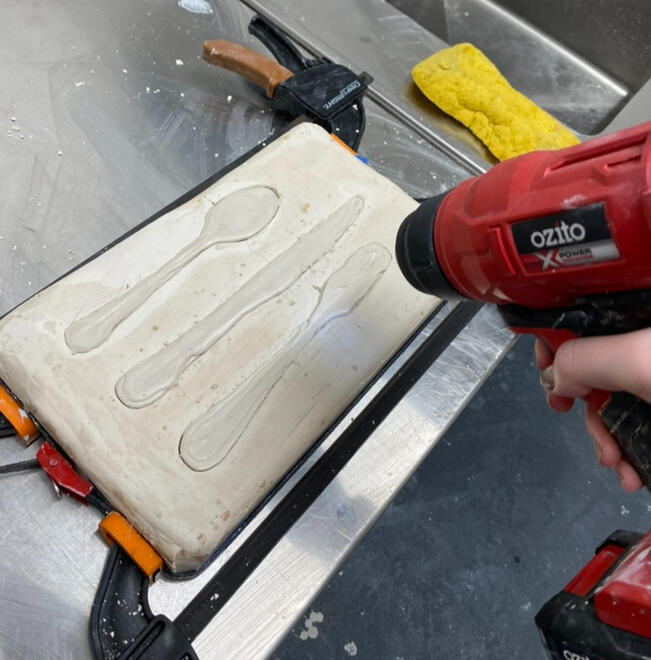
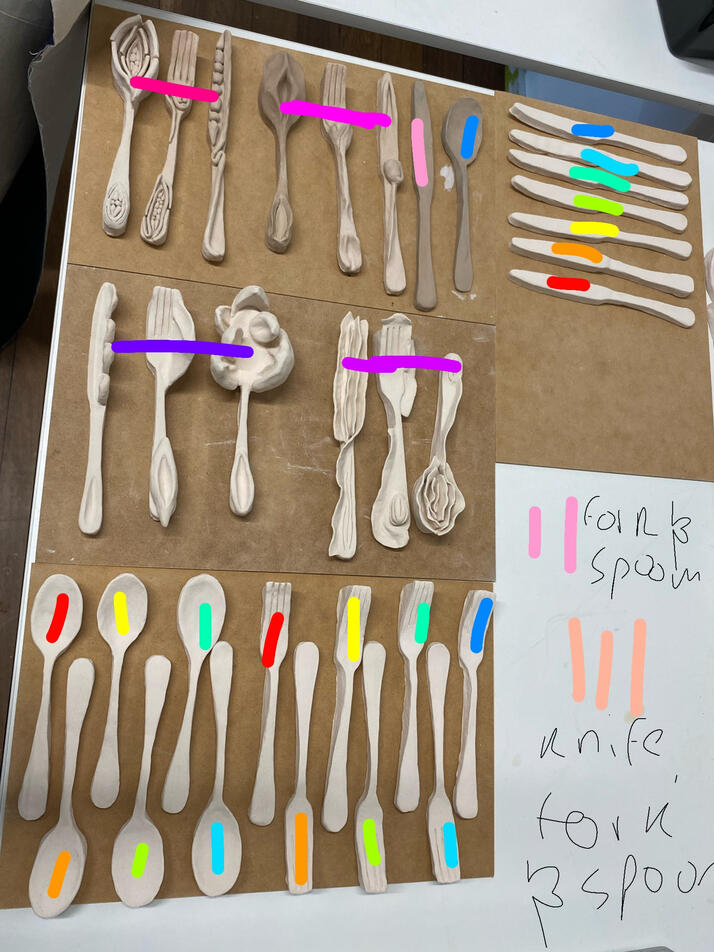
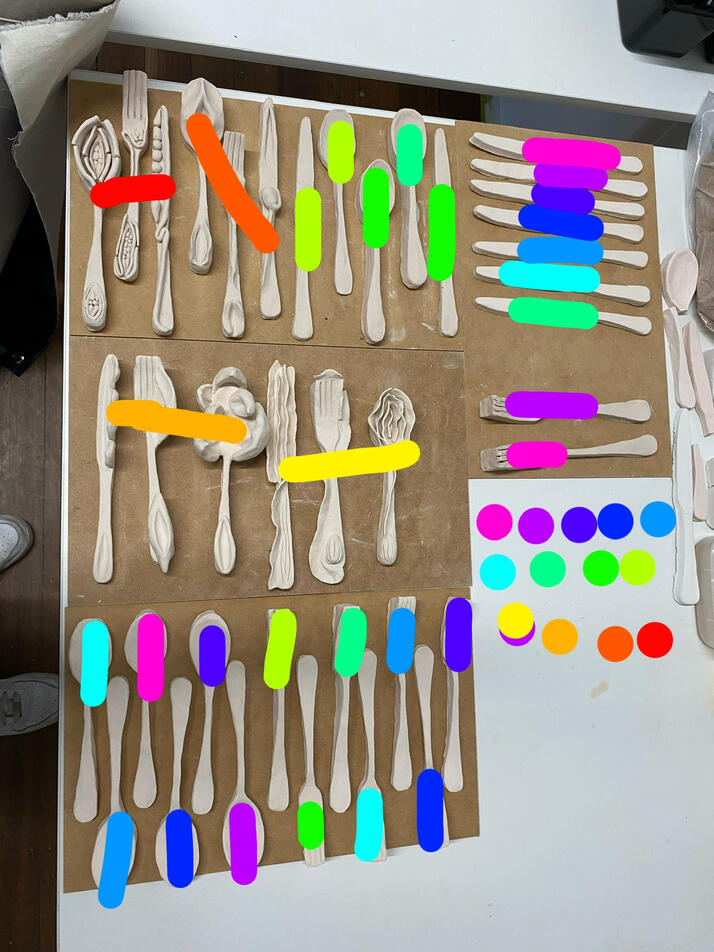
23-05-2023
my attempt at making a set with my plaster mould did not go well, I left it in there for too long and so they just crumbled. As well as my full spread of sets at this point.
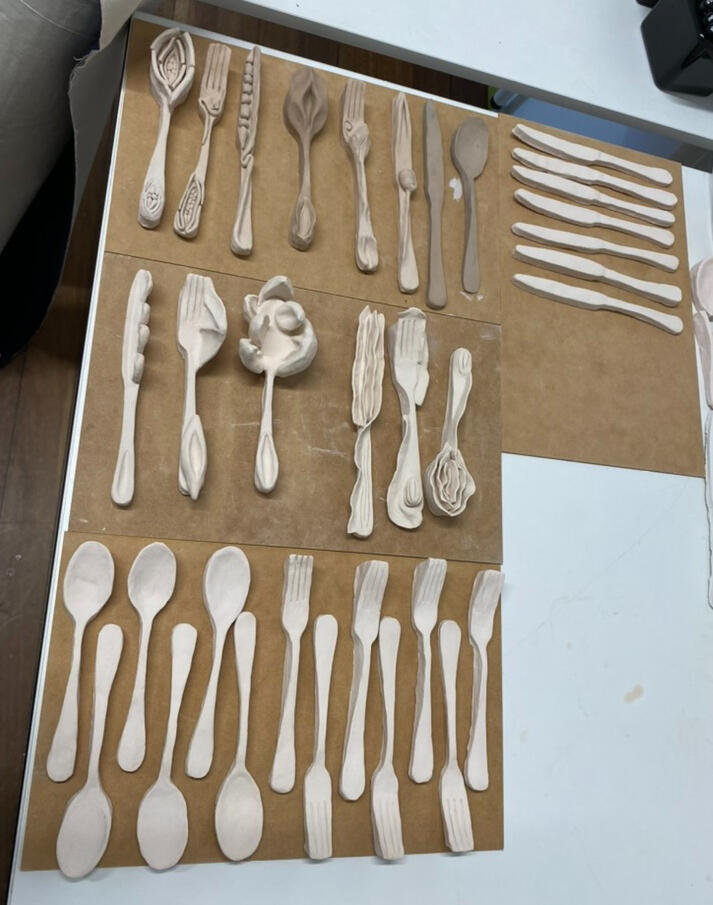
I used the below image to check what pieces I was missing, as when I counted I didn't have 13 sets. This really confused me because even though some pieces broke in the bisque, I still thought I'd have enough. I think I left out one set hoping to use my mould to make at least one, but this didn't end up happening.
26-05-2023
I hand built the remaining pieces I needed over this weekend so they'd be ready for firing on Tuesday afternoon. I didn't take a photo of these.
28-05-2023
Today I put the remaining pieces in the kiln to be fired. Below is a photo of all the pieces together before the last couple went in the kiln for another full fire.
30-05-2023
I checked on my pieces today after being fired and something rather strange happened to them in the kiln. I don't know what it was, but they came out slightly discoloured and very textured, more so than when they went in. I stupidly didn't take a proper photo of this and as I'm typing this I've finished painting them all. I was using recycled clay, so it's possible it was just something with the bag I used, but all of my pieces came from the same bag, so I don't know why this batch reacted like this, whilst all my others were normal.
Jan came around again sometime this week and gave me some more feedback, so sand the bottom edge so they have a bit of lift, and then try and install them on the wall. I tried to get the wall hanging to work today, but I just couldn't for a number of reasons. I couldn't find a drill bit that worked properly, and because of the construction of the pieces, getting them on the wall was rather difficult.
I also couldn't sand the edges down like I wanted, as a family medical emergency came up and I went to visit them in the hospital for the better part of my day Friday, and I had to work on Saturday.
02-06-2023
Today I sat down to begin painting the plain sets of cutlery, hoping to get 7 done today so I only had 6 to do tomorrow.
The flat sets were surprisingly a bit difficult, as I hadn't really planned how I was going to adapt the plate onto the cutlery. I opted to use a similar technique to how I went about my 3D sets, making the"core' of the plate the centre of the spoon and the handle of at least one of the knives and forks. Below is what I finished on this first day, starting at about 10-10:30 am and finishing about 5:30-6 pm.
03-06-2023
Today I finished painting the sets. Yesterday I glued some of my broken pieces together, as I didn't have enough time to make new pieces and I needed to paint them today. I finished my flat pieces and began on my 3D sets. These were much easier to do, as the 3D additions acted as a guide for how to paint, which meant I finished much earlier than yesterday. Started at bout 9-9:30 am and finished at about 12 pm. After this, I went to Ikea to buy some plain, cheap plates to display the cutlery with. I wasn't sure if I was going to do this, but I do think they'll look moreeffective with this addition.
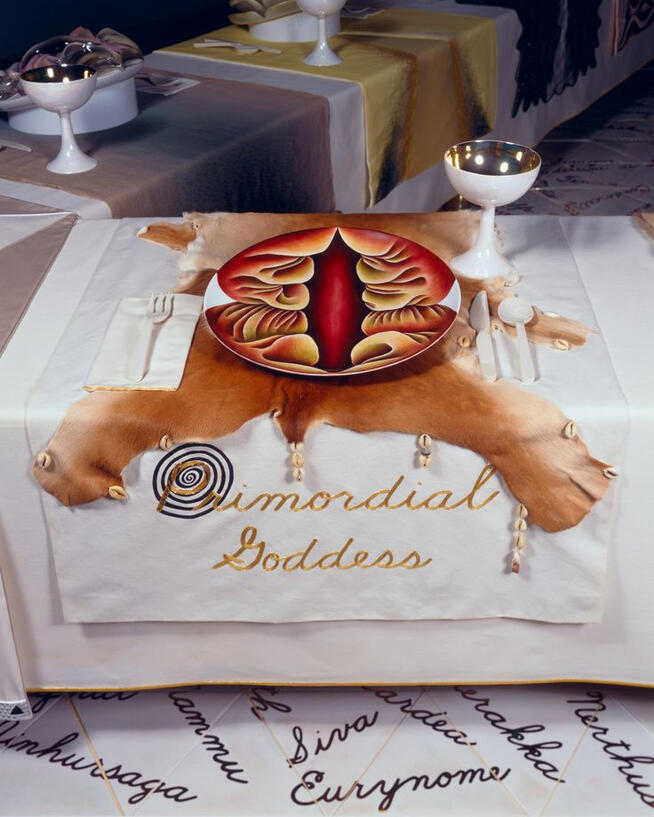
1. Primordial goddess
2. Fertile goddess
3. Ishtar
4. Kali
5. Snake goddess
6. Sophia
7. Amazon
8. Hatshepsut
9. Judith
10. Sappho
11. Aspasia
12. Boadaceia
13. Hypatia
14. Marcella
15. Saint Bridget
16. Theodora
17. Hrosvitha
18. Trotula
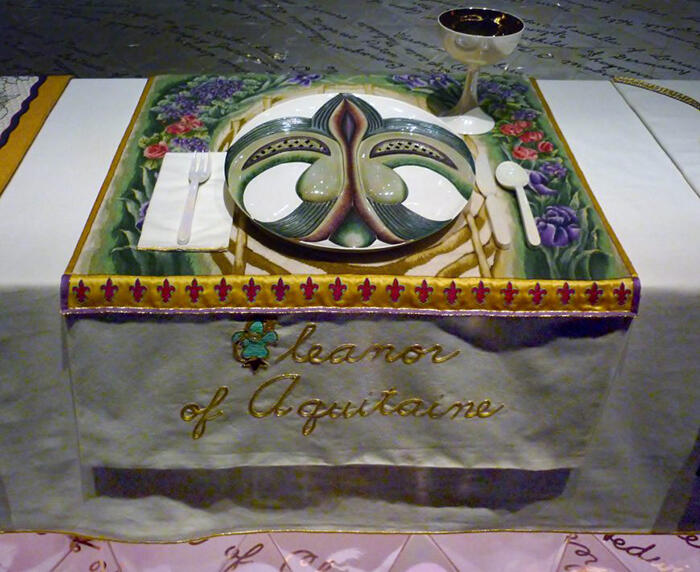
19. Eleanor of Aquitaine
20. Hildegarde of Bingen
21. Petronilla de Meath
22. Christine de Pisan
23. Isabella d’Este
24. Elizabeth R
25. Artemisia Gentileschi
26. Anna van Shurman
27. Anne Hutchinson
28. Sacajawea
29. Caroline Herschel
30. Mary Wollstonecraft
31. Sojourner Truth
32. Susan B. Anthony
33. Elizabeth Blackwell
34. Emily Dickinson
35. Ethel Smyth
36. Margerta Sanger
37. Natalie Barney
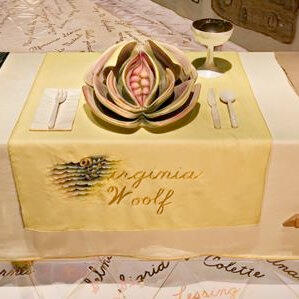
38. Virginia Woolf
39. Georgia O’Keeffe
Research:Date: 04-03-2023
Prehistory to Classical Rome:1. Fertile Goddess
Research:
- Supreme site of fertility, motherhood and the creation of life
- Early evidence from archeological finds typically showcase paintings and figurines of women with exaggerated sexual characteristics to emphasise fertility
- Venus of Lespugue and Venus of Willendorf
- Sculpted by women looking down at their own bodies
- Depicted pregnant
- Similar deities were worshipped across a huge range of cultures throughout time
- Marija Gimbutas (leading early goddess worship scholar) links these creations with water as they are typically depicted together
- A significant archeological site providing evidence for the workshop of the Fertile Goddess includes Çatal Hüyük in Anatolia (present-day Turkey)
- Goddess is depicted as pregnant or in the middle of giving birthAt the Table:
- Prehistoric elements related to societal roles for women
- Table runner used methods similar to that that was potentially used by Paleolithic-era women
- Bone needles and hand-spun/dyed wool
- References for coil baskets and pottery made by women
Textiles (burlap) references are textiles
- Influenced by early goddess images like Venus of Willendorf
- Ample forms echoes in fleshy qualities on the plate
- Shells and starfish are also referenced due to the correlation between women and the sea
- “The plate’s central core (or vulvar) imagery includes round forms suggestive of breasts and other natural elements linked to female fertility, such as seeds”2. Hatshepsut
Research:
- Served as Egyptian pharaoh whilst the ‘official’ king was too young
- Went above and beyond to ensure her claim to the throne
- She didn’t have any male children with her husband, so the first-born male from her husband’s (Thutmose II) secondary wife became the next in line to the throne despite being far too young
- Often depicted in reliefs as a male pharaoh with a fake beard, depicted as female in men's clothing/dress
- Her divine birth and coronation scene in Deir el-Bahari in the Valley of the Kings is highly famous
- Claim to the throne by claiming her father is the chief god Amun
- Success as a ruler was seen through the expansion of trade and commercial connections, as well as several extravagant building projects undertaken during her rule
- When Thutmose III was old enough for the throne, he took steps to remove Hathsepsut’s name from many recordsAt the Table:
- Her plate is the first to have raised qualities, signifying her authority over Egypt
- The change is almost imperceptible
- Utilises techniques popular in Egypt, the low relief which features figures protruding slightly from the surface
- The colours used on the plate resemble those used in Egyptian tomb reliefs and paintings
- Shapes and forms resemble Egyptian hairstyles, headdresses, pharaonic collars and the partial profiles used in Egyptian portraits
- Runner represents the economic prosperity during Hatshepsut’s time
- The pink and green border mimics geometric motifs seen in Hathspesut’s tomb
- Inclusion of the eye of justice and the life-giving symbol of the pharoah3. Sappho
Research:
- Innovated poetry through her first-person narration and refining of the lyric meter
- Head of essentially what was a grammar school for young unmarried girls, where they learnt social queues, composition, singing and poetry recitation
- She is considered one of the first to write poetry that was more emotional and personal
- Wrote poems on love and emotions like passion, jealousy, affection and hatred
- Wrote in the local dialect, with common expressions and words
- The lyric metre she refined is now called the sapphic meter
- In the 4th century, the church destroyed her work due to the erotic and lesbian imagery that includedAt the Table:
- References to Greek art and architecture
- Reference to her as the “flower of the graces”
- Incorporates vulvar imagery in an abstract floral form with purples, blues and greens
- The colour palette is a reference to the Aegean Sea
- The wavy lines of the border mimic the long curly hair often found in Greek statues of the Classical period
- Includes reference to her use of the lyre which accompanied her poetry4. Boadicea
Research:
- The name has many spellings (Boudica being one)
- Come from the Celtic word “bouda” meaning victory, the modern equivalent would be Victoria
- Warrior queen from Celtic Britain who ruled in the 1st century
- Married to the king of the Iceni people, who swore allegiance to the Roman Empire
- Rome annexed his kingdom after his death, Iceni people’s property was stolen, Boudica was beaten by soldiers and her daughters r*ped
- When a revolt began they chose Boudica as their leader, where small battles were won until the Roman army was brought in in full force
- She died shortly after of contested tales, either she poisoned herself or died of an illness
- Buried the same as that of a great leaderAt the Table:
- Runner constructed from felt, which is said to be the first fabric predating women's textiles
- Traditions processes used to make it
- The curvilinear forms on the plate signify both Boudica’s personal strength and the Roman encroachment upon her autonomy and power
- References to Stonehenge on the plate, along with a stylised golden helmet and Celtic patterns
- Enamelled jewels are a reference to her status as a queen
Date: 08-03-2023
Christianity to the Reformation:5. Marcella
Research:
- A Roman noblewoman who was declared a saint for her role in founding Christian monastic systems
- Where nobles denounce their worldly possessions and declare their lives to God
- She was married young and widowed shortly thereafter
- Declared celibacy rather than remarrying
- Turned her palace into a monastery where other noble women joined her
- Began the Roman monastic movement
- Despite giving away all her wealthy possessions, when the Goths invaded she was beaten to try and attain the location of her treasure
- Died from the injuries she sustained
- A lesser-known saint
- Her saint’s say is January 31stAt the Table:
- Decorated with symbols of sainthood and the Christian church
- The runner features architectural plans for early Christian basilicas
- The runner is made of the material used by women in the convent to make shirts
- The irritating texture was worn under clothing as a form of penance6. Petronilla de Meath
Research:
- The first Irish Women were burned at the stake for heresy
- Earliest women accused of witchcraft
- The church believed the lady she worked fro came into her riches through dubious means
- Meath confessed, stating they applied a magical ointment to a wooden beam which let both the women flyAt the Table:
- Familiar symbols of witchcraft from Petronilla’s time and today's time
- Celtic motifs are also incorporated
- The plate also includes these symbols, such as a bell, a book and a candle
- The cauldron represents the Great Mother and the meeting place of covens
- The flames on the plate are an inversion of the sacred fire that burned in honour of the goddess7. Christine de Pisan
Research:
- A medieval writer and historiographer who advocated for women’s equality
- Her works are considered some of the earliest feminist works
- Also, the first woman in France and potentially all of Europe, who earned a living solely through writing
- Daughter to the astrologer and secretary of King Charles V of France
- Allowed her to access exceptional libraries
- Her husband supported her endeavours
- Discusses many feminist topics, including the source of women’s oppression, the lack of education for women, different societal behaviours, combating a misogynistic society, women’s rights and accomplishments, and visions of a more equal worldAt the Table:
- Her plate is an abstract butterfly painted in reds and greens
- Has one wing raised in defence to symbolise her efforts to protect women
- The runner is made with techniques originating in medieval Italy8. Artemisia Gentileschi
Research:
- Early Italian Baroque painter and the only female follower of Caravaggio
- Focus on biblical heroines
- Daughter of a painter as well
- Served as an apprentice to her father where she learnt the skills
- Her father hired another teacher to further her education
- This teacher r*ped her
- After a long trial, he was arrested
- This event negatively impacted her career as her reputation was hit
- The first woman to be accepted into the Florentine Academy of Fine ArtsAt the Table:
- Linking the setting to her famous subject Judith through the colour palette
- Velvet was used it was common for Gentileschi’s female subjects to wear
- Along with the gold which became a symbol of her work
- The runner is almost engulfing the plater, representing the safe environment her father tried to create for her
- Butterfly imagery on her plate references techniques used by her master
- The use of light and dark is a reference to the theatrical quality of her painting style
- The twisting and turning form on her plate represents the efforts of women during Gentilischi’s time who desired to become an artist
Date: 08-03-2023
American Revolution to the Women's Revolution:9. Susan B Anthony
Research:
- Abolitionist and woman’s suffrage movement
- Her contribution led to the inclusion of women in the US political process
- Born into a household committed to social justice
- She began to teach at 16 and by 1837 organised a campaign to demand equal pay for female teachers
- In 1848 she formed to Woman’s New York State Temperance Society
- Became a huge women’s rights activistAt the Table:
- Her place at the table is representative of Chicago’s belief that she is the queen of the table
- The 3D forms on her plate lift the surface in an attempt the escape its confines
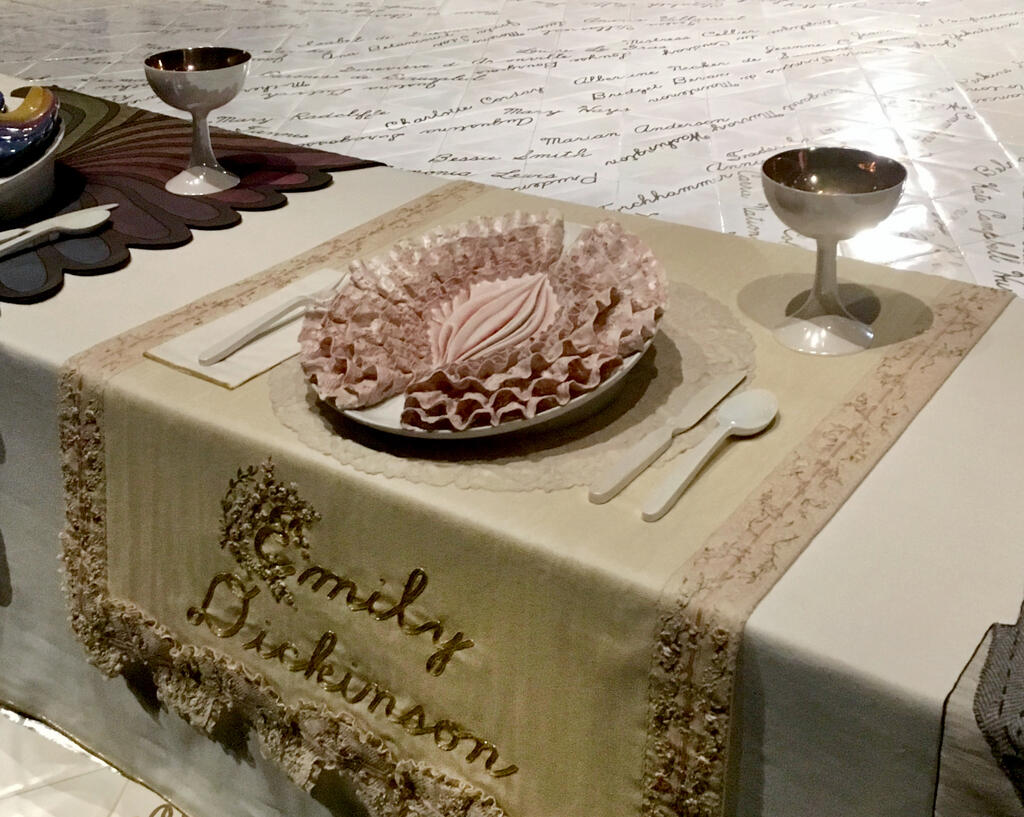
- They wanted a forceful image10. Emily Dickinson
Research:
- Considered one of the most famous poets in American history
- Her poems defied the 19th-century expectation that women were submissive to men
- There was a great contrast between her and her writing
-By her 30’s she remained largely indoors and out of social circles
- She bent literary conventions, demonstrating an understanding of formal poetic structure even as she defied it
- She wasn’t known for her writing during her lifetimeAt the Table:
- Represents the striking contrast between her introverted nature and her writing
- On the plate sits a 19th-century collar which has a strong yet delicate centre imprisoned within layers of immobile lace
- These layers were made through lace draping, where lace was saturated in porcelain slip and fired
- The runner is stained with tea and coffee to make it appear ages
- Features techniques from the 19th century11. Virginia Woolf
Research:
- Renowned British novelist associated with the modernist movement in literature
- Experiments in language, narrative and treatments of time
- Wrote in a stream-of-consciousness prose style
- Sometimes considered psychological novels
- Introduction of new narrative methods
- Women’s writingAt the Table:
- Resembles a blooming flower represents Woolf’s advocacy for unrestricted expression
- Harkens back to the powerful fertility image of the goddess plates at the table
- Creative decundity
- Flower to serve as a metaphor for the fruitfulness of Woolf’s creative genius
- The way the petal burst forth is meant to represent Woolf’s encouragement of other women to break from the masculine literature style
- The runner references her book To the Lighthouse in its beam
- The chiffon fabric can be a reference to her mental fragility12. Georgia O’Keeffe
Research:
- A well-known American painter is known for her inclusion in the feminist art movement
- Her style resembles organic vulvar forms and floral imagery
- Her life influenced her art
- Images from New York and Mexico appear in her paintings
- Knew she wanted to be an artist from childhoodAt the Table:
- Her plate has the most height, signifying her artistic liberation and success as a female artist
- Incorporates form she used in her own flower paintings with the central core
- Chicago pays homage to her works